How to make a Jedi crusader pendant
In the Last Jedi, there was a background prop on Ahch-To. A very small prop in the quarters of Luke Skywalker. Who cares right? It's just a cool looking necklace with a crystal in it, no need to get caught up in--
*Nerd alert* All hands on deck*
*Nerd alert* All hands on deck*
--but in the Last Jedi Visual Encyclopedia they call it a "Jedi crusader pendant"! What does that mean? That a Jedi took a trophy from a dead Sith is unthinkable considering what we know in the prequel films. Unless they're referring to the Revan era of the Old Republic. Maybe it's an Easter egg for a new movie trilogy? For the love of the Force make this from the Revan era! WE NEED A REVAN MOVIE--
*Resuming normality*
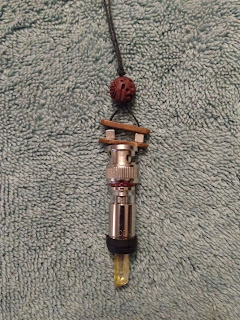
--wait what? Sorry, I must have slipped into Expanded Universe mode. Anyway, it's a cool prop and I thought I'd try to recreate it with some basic hardware and crafting materials. Here it is!

*Resuming normality*
--wait what? Sorry, I must have slipped into Expanded Universe mode. Anyway, it's a cool prop and I thought I'd try to recreate it with some basic hardware and crafting materials. Here it is!


 |
| Loonatic's build of crusader pendant (upper left), closeup of Jedi crusader pendant (upper right), and full picture of the pendant in Star Wars The Last Jedi Visual Dictionary by Pablo Hidalgo. |
 Materials
-Waxed linen thread ($3 for 25yds)
-BNC compression connector (BG-59) ($9 for 4pack)
-1inch quartz crystals (Varied)
-Spacer beads
-Earbud covers (from adjustable headphones)
-Small gauge jewelry wire
-Superglue
-Spacer beads
-Earbud covers (from adjustable headphones)
-Small gauge jewelry wire
-Superglue
-Assorted stone and wood beads
Tools
-Scissors
-Needle nose pliers
-Wire cutters
1. Plan of attack
For my approximation of the Jedi crusader pendant, I made certain choices to balance out my abilities and resources. I don't have a lathe or other major metalworking tools to make an exact replica, so my goal was to use existing hardware to emulate the look of the pendant. I got My first drawing included ideas for using electrical components.

I played around with a bunch of different electrical bits as primary crystal mount. Below are some of them, from left to right being split-bolt connector, compression f-connector, an unknown greeblie, and BNC compression connectors in regular and T-shapes.

My Mark 1 pendant used a copper split-bolt connector and cotton cord, which is kind of neat but not really optimal. The quartz crystal doesn't sit well in the mount and would need to be glued in, and the cotton cord frays quickly.

The materials for this tutorial are pretty simple. You can pick up the BNC compression connectors from the electrical section of most hardware stores, and the other components can be found in a craft supply stores.
Getting some nice quartz crystal points can be a bit of challenge, especially getting some that are dyed well. Most are dyed using a technique called quench cracking, which depends of heating and cracking the quartz in order for the dye to take hold. It doesn't take a strong color, and getting a red near impossible. But it is translucent like the kyber crystals you see in film. Plating is another method of coloring the quartz and creates a cool effect, though finding it in the right size can be difficult. I make do with what I find in local craft stores, which have the benefit of already having holes drilled for jewelry-making, but you might be able to find better. You might even choose to use quartz-style points made from other semi-precious stones.
3. Fitting the crystal
First off, try a couple of crystals in the end without the gold pin. There's a couple of different ways you can try to fit the crystal into the BNC compression connector. I reckon you can fix it in there easily enough with enough superglue, especially if the crystal already fits pretty snugly in the connector. But if there's a little wiggle room, you can use an extra earbud cover to fit and seal it in. You can get earbud covers from a pair of cheap headphones, which often have different sizes of earbud covers for people to adjust it for your ears.

I used the smallest earbud cover and slipped it over the crystal.

I carefully peeled back the outer rim of the earbud, folding it toward the crystal tip.

I fitted the end of the crystal into the connector, and then pulled the out rim back into position. It takes a little patience and fiddling, but I think it adds an interesting element.

4. Adding the cord
Cut a length of waxed linen cord, about 40 inches long. You can vary the length of the cord if your aim is to make it a necklace, key chain, rearview mirror charm, or whatever, but err on the side of too much cord rather than too little.
Cut a length of waxed linen cord, about 40 inches long. You can vary the length of the cord if your aim is to make it a necklace, key chain, rearview mirror charm, or whatever, but err on the side of too much cord rather than too little.

Next, string the cord onto the connector.

Feed the cord through one of the slots in the wall of the outer ring and then through other matching slot. Pull the cord through so that the connector is halfway along the entire cord.

Feed the cord back through the slot again and tie a simple overhand knots for each side.


This will keep the cord secure in the middle.
5. Stringing decorative pieces
Since this isn't meant to be an exact replica, the pieces above the metal can have some decorative pieces. I'm in favor of using a mixture of metal, bone, wood, and stone beads. If it's the trophy of a Sith, it might have details of bone and metal. If it's an artifact of an ancient Jedi, I'd think it'd be more subtle with wood or stone. Also, keep it simple. The focus of the piece is the crystal and "lightsaber" components. The examples below some of those variations, with silver 3-hole spacer beads.


Stringing them should be straightforward enough. But to keep the beads from sliding around, tie a knot snug against the last bead.


And there you have it, one way to emulate the Jedi crusader lightsaber pendant seen in The Last Jedi. Good luck and keep crafting!


Comments
Post a Comment