How to make an E-11 blaster holster
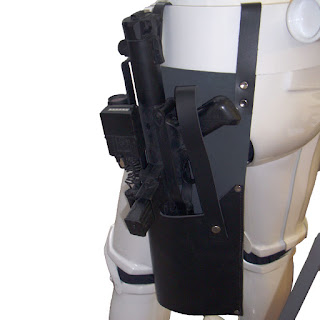
So in making the E-11 blaster for the Iden Versio build, I've been looking for a good guide on making a matching holster. I'd post the blaster build first, but I've been having a slight weapons malfunction in the paint job. Like the blaster, there's a fair number of templates and tutorials out there targeted at stormtrooper cosplay. On this one I decided not to reinvent the wheel, though instead of using leather I'm going for black "leather" vinyl, which is cheaper and somewhat easier to work with. This build is based on an excellent holster tutorial by Ayen_s of 1st Imperial Stormtrooper Detachment, but some of the rivet details are inspired by Shepperton Design Studios.
Materials
-Black "leather" vinyl
-Thin, flexible plastic (3-ring binder, $1)
-Snap fastener kit ($5 a package, snaps and tool)
-Double-sided rivets ($4 a package)
-Black heavy-duty thread (already had)
-Paper for template
-Super glue (if needed)
Tools
-Scissors
-Crop-o-dile
-Thick needle
-Awl/small screwdriver
-Marking pen
-Black "leather" vinyl
-Thin, flexible plastic (3-ring binder, $1)
-Snap fastener kit ($5 a package, snaps and tool)
-Double-sided rivets ($4 a package)

-Black heavy-duty thread (already had)
-Paper for template
-Super glue (if needed)
Tools
-Scissors
-Crop-o-dile
-Thick needle
-Awl/small screwdriver
-Marking pen
1. Recreate the template
I started by recreating the Troopermaster template from the tutorial. I made the belt straps longer, to 7 inches to accommodate the 2 inch wide belt. The little squares included in the template I found to be superfluous, but I added an another 6x7 inch panel to make the upper part of the holster double-sided.
2. Cut out the vinyl pieces
Using the template, cut out the pieces for the main body of the sheath, the straps, and the extra rectangle. I went ahead and modified the bottom edge of the rectangle, but I don't think it's really needed.
Using the template, cut out the pieces for the main body of the sheath, the straps, and the extra rectangle. I went ahead and modified the bottom edge of the rectangle, but I don't think it's really needed.
3. Cut out plastic sections
Using the template, cut out a section of plastic that would sit in the cradle of the holster. Then cut a rectangle of about 6x7 inches. The rectangle will reinforce the upper part of the holster. This thin plastic from a flexible three-ring binder adds structure and strength to the thin vinyl holster. I bought a black binder from a dollar store for--as you might expect--$1. Preferably, this should be black to match the rest of the holster.
4. Sewing up the holster
I used a running stitch to attach the rectangle piece to the rest of the holster. I started at the lower left corner of the rectangle, and worked my way clockwise around the edge. Along the right edge I kept going down the right edge of the holster's cradle. This should leave the bottom edge of the rectangle free of stitching. Insert the plastic rectangle piece into this sleeve. Depending on your seam allowance, you may have to cut down this plastic piece until it fits.
5. Adding rivets
Double sided rivets are relatively simple to install, especially if you have crimping tool like a Crop-o-dile. First you site the locations by using a small holepunch, then you feed the two sides of the rivet through the hole. I carefully installed the rivets to attached the belt straps to the holster, being sure not to interfere with the stitching. It has the benefit of also piercing and holding the upper plastic insert in place.
I also added two rivets along the right edge of the holster's cradle, to reinforce the stitching and secure the plastic in the cradle.
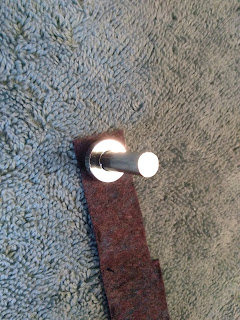
Finally I riveted the last strap into place. This required a bit more creativity, as it's too far away from the edge for a conventional hole punch or for the Crop-o-dile to work. I poked a hole using an awl and secured the last rivet with a hammer strike. The placement of this last strap could use the guidance of the template, but I adjusted the location a little according to how the blaster sits in the holster.
6. Adding snaps
Yeah, I hate snaps. It took me some time to figure the best way to affix snaps, and I definitely screwed up way more than I should have. I tried using the Crop-o-dile to place snaps, but found it was awkward, crunched the snaps, and didn't fix them securely. Instead I went for the basic snap fastener kit with the metal tool included, striking the tool with a hammer to set the snap.
I added the female end of the snap to the holster's cradle, and attached the male end to the underside of the strap. I screwed up this the first time so I attached the male end to a scrap, then cut it to size, and then sewed the scrap to the strap. It all worked out though, and I don't think it's too noticeable.
So here it is, the finished E-11 blaster holster. Good luck and keep crafting!


Comments
Post a Comment