How to make a simple medieval hood from cloth napkins
All right, so to exercise my rudimentary sewing skills I have challenged myself to make a medieval hood. Before committing myself to making a more complicated design with my better fabrics, I decided to play around with basics with some fabric that won't matter if it goes all to hell. So I experimented with some old cloth napkins and it worked out pretty well. Obviously the rougher design is not all that useful for cosplaying as nobility, but could easily work for a basic outlaw, forester, or Robin Hood type costume. Forgive the stare of death, I needed a dramatic photo...

Materials
-4 decorative table napkins
-Antler or other medieval-type button
Tools
-Scissors
-Needle/thread
-Superglue
-Measuring tape
1. Gather the materials
The materials list is pretty simple. The key part here is finding a set of four cloth napkins that have a believably medieval look to them. Given the roughshod approach, this is a hood better suited to a lower-status medieval person, so a serf, peasant, outlaw, etc. Accordingly, the color, pattern, and material should reflect that. So the materials should be mostly cotton or linen and the weave/pattern fairly rough or simple. The colors should be more like common natural dyes (brown, green, yellow, etc.). Shiny, heavily decorated, polyester holiday napkins probably aren't the best bet if you're aiming for a more realistic costume. I bought the two sets of cloth napkins you see in the tutorial for 50 cents each from a thrift store.
You'll also need some way to fasten the collar of the hood together to keep it in place. I found a place that sold antler pieces already drilled with button holes, but you can easily find a medieval type button or clasp at your local craft store. Go for something either made of natural or simulated natural material (wood, bone, antler, horn, shell) or a very basic metal button. Alternatively, you could skip the button approach and use a clasp set or some leather ties.
2. Make the collar
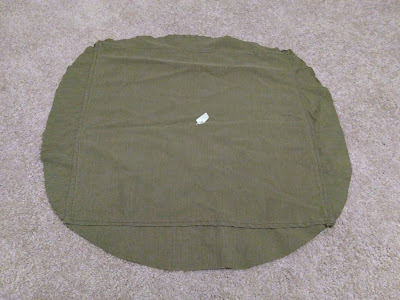
The first two cloth napkins will be needed to make the collar piece. One napkin will be the main body of the collar, and then other will be cut up to add more material to the main body. To keep the rounded shape of most hoods, I decided to use the second napkin to fill out a larger circle on the first. The second napkin was carved up into half ovals to be stitched onto the main napkin. (Note: the fabric in this first picture looks different from the rest because it is indeed different fabric. I didn't have this shot with the other fabric so here it is!)

Next, measure the circumference of your neck with measuring tape. Do a little math to figure out what the diameter of that circle would be, add about an inch, and then cut that hole out of the center of the collar. Try to cut as accurately as possible.

Then cut line from the neck-hole to the edge of the collar. This will be the front of the collar, where you will later add a button to secure the hood around your shoulders.

3. Make the hood
To make the actual hood, you'll need napkins three and four. You can change the size of the hood of course, but generally you want to go larger than smaller. I decided to make pretty much as big a hood as you can make with these napkins. Pin the two napkins together, mark a large quarter of a circle on the napkin, and cut off the excess.

This is what is what it would look like after the cut.

Finally, sew up the curved edge. I turned the napkins so that their undersides were out, and then sewed up the curved edge with an overcast stitch.

Afterwards, turn the fabric right side out and the stitches are pretty much invisible.

4. Attach the hood to the collar
First pin the hood into place. This will give you an idea of how it will be stitched into place.

The trick here is that the edge of the hood piece is much longer than the edge of the neck hole. So the first step is to secure the hood to either side of the neck hole front. Then sew a few stitches to secure the hood's seam to the back of the neck. Also use a few stitches to do the same half way between the back and the front on either side.

This sewing of the five equidistant points ensures that the hood will be sewn on more or less evenly.

The next step is to sew shut the additional hood material, kind of like sewing a dart. Pin the extra material shut, then sew it closed from the inside of the hood. From the outside, this will appear as in an innocuous fold.

5. Add the button
First, figure out the placement. I decided to put the button a little lower, about 1.5 inches below where the hood and collar meet. It might work a little better if it was right at the neck line though.
 Then cut the buttonhole, a vertical slit that is as long as the maximum width of the button. I just mimicked what most button-down shirts do and put the buttonhole on the right side of the shirt (as you're wearing it). I looked up the basics of hand-sewing a buttonhole and just did that.

Admittedly my execution is pretty sloppy, but it worked.

Yeah it'll work out fine. I'm not going to attempt to explain the process, just look up how to hand-sew a buttonhole.

Then sew on the button on the other side. This is pretty self-explanatory, but there are also plenty of tutorials out there if you need some tips.

And there you have it! A medieval hood that doesn't require any crazy materials or a complicated pattern. To be fair, you can find a lot of basic hood patterns out there, but for me it was a great exercise in making clothing without a formal pattern. Anyway, here's another way to make a medieval hood! Good luck and keep crafting!


Materials

-4 decorative table napkins
-Antler or other medieval-type button
Tools
-Scissors
-Needle/thread
-Superglue
-Measuring tape
1. Gather the materials
The materials list is pretty simple. The key part here is finding a set of four cloth napkins that have a believably medieval look to them. Given the roughshod approach, this is a hood better suited to a lower-status medieval person, so a serf, peasant, outlaw, etc. Accordingly, the color, pattern, and material should reflect that. So the materials should be mostly cotton or linen and the weave/pattern fairly rough or simple. The colors should be more like common natural dyes (brown, green, yellow, etc.). Shiny, heavily decorated, polyester holiday napkins probably aren't the best bet if you're aiming for a more realistic costume. I bought the two sets of cloth napkins you see in the tutorial for 50 cents each from a thrift store.
You'll also need some way to fasten the collar of the hood together to keep it in place. I found a place that sold antler pieces already drilled with button holes, but you can easily find a medieval type button or clasp at your local craft store. Go for something either made of natural or simulated natural material (wood, bone, antler, horn, shell) or a very basic metal button. Alternatively, you could skip the button approach and use a clasp set or some leather ties.
2. Make the collar
The first two cloth napkins will be needed to make the collar piece. One napkin will be the main body of the collar, and then other will be cut up to add more material to the main body. To keep the rounded shape of most hoods, I decided to use the second napkin to fill out a larger circle on the first. The second napkin was carved up into half ovals to be stitched onto the main napkin. (Note: the fabric in this first picture looks different from the rest because it is indeed different fabric. I didn't have this shot with the other fabric so here it is!)

After cutting the half ovals, you sewn them onto the main body napkin to form a circle. I did this part when I had access to a sewing machine, so it was attached very quickly with a basic running stitch.

Next, measure the circumference of your neck with measuring tape. Do a little math to figure out what the diameter of that circle would be, add about an inch, and then cut that hole out of the center of the collar. Try to cut as accurately as possible.

Then cut line from the neck-hole to the edge of the collar. This will be the front of the collar, where you will later add a button to secure the hood around your shoulders.

To make the actual hood, you'll need napkins three and four. You can change the size of the hood of course, but generally you want to go larger than smaller. I decided to make pretty much as big a hood as you can make with these napkins. Pin the two napkins together, mark a large quarter of a circle on the napkin, and cut off the excess.

This is what is what it would look like after the cut.

Finally, sew up the curved edge. I turned the napkins so that their undersides were out, and then sewed up the curved edge with an overcast stitch.

Afterwards, turn the fabric right side out and the stitches are pretty much invisible.

4. Attach the hood to the collar
First pin the hood into place. This will give you an idea of how it will be stitched into place.

The trick here is that the edge of the hood piece is much longer than the edge of the neck hole. So the first step is to secure the hood to either side of the neck hole front. Then sew a few stitches to secure the hood's seam to the back of the neck. Also use a few stitches to do the same half way between the back and the front on either side.

This sewing of the five equidistant points ensures that the hood will be sewn on more or less evenly.

The next step is to sew shut the additional hood material, kind of like sewing a dart. Pin the extra material shut, then sew it closed from the inside of the hood. From the outside, this will appear as in an innocuous fold.

5. Add the button
First, figure out the placement. I decided to put the button a little lower, about 1.5 inches below where the hood and collar meet. It might work a little better if it was right at the neck line though.


Admittedly my execution is pretty sloppy, but it worked.

Yeah it'll work out fine. I'm not going to attempt to explain the process, just look up how to hand-sew a buttonhole.

Then sew on the button on the other side. This is pretty self-explanatory, but there are also plenty of tutorials out there if you need some tips.

And there you have it! A medieval hood that doesn't require any crazy materials or a complicated pattern. To be fair, you can find a lot of basic hood patterns out there, but for me it was a great exercise in making clothing without a formal pattern. Anyway, here's another way to make a medieval hood! Good luck and keep crafting!


Hey look, something cool I can make!
ReplyDeleteGreat articles and great layout. Your blog post deserves all of the positive feedback it’s been getting. hand block print fabric online
ReplyDelete