How to make Iden Versio's belt
Another piece of the Iden Versio costume is the belt. Although not hard or expensive to make, it's unique enough to require some thought. Not quite a rebel pilot or stormtrooper belt, it incorporates a bit of both. Besides the belt itself, there is the E-11 blaster holster, two "dropboxes", a leather back pouch, and space for the leg harness to attach. Some of it is hidden under the arm-knotted flight suit, but in these reference images there's enough to determine the basic elements of the belt.


Inspiration/Reference Images

Materials
-Basic black 2inch "quick-release" belt
-Two basic smartphone cases
-Silver metallic spray paint
-Black spray paint (matte or satin)
-Clear coat enamel spray paint
-Black "leather" upholstery fabric
-Large rectangular silver slide buckle
Tools
-Scissors
-Hot glue gun
-Needle/thread
-Rivet/hole punch tool
1. Gather the materials
For this project I picked up parts from lots of places. From the hardware store I got the basic utility belt and spray paint. From a dollar store I found some basic clear smartphone cases, and from the craft store I found a nice thick "leather" upholstery fabric in the remnants pile. The hardest find was to get just the right buckle. Costumer Lady Mary custom-made her own metal slide buckles, but since I don't quite have the tools or the skills I relied on the fates of the thrift stores. And what do you know, fortune shone on me and I found a belt with 8 silver slide buckles for $5. It's not as flattened out as the one in the reference image, but the shape and look is pretty close.
2. Making the dropboxes
The "dropboxes" are two items worn on front side of the belt with indeterminate purpose. Stormtroopers carry something similar that appears as white plastic, but I can't find much that actually states what they area. Fortunately they are not difficult to simulate. Close-up shots make them hard-sided, around the size of a smartphone, and make them appear matte black with silver showing around the edges. This would suggest they are metallic, with the underlying metal showing through on points of hard wear, kind of like a E-11 blaster would. Start with the simple smartphone case. When finding them, go for the plainer the better. A case that is untextured, has relatively hard sides and minimal cut outs ideal.


For any holes left in the case, usually left for a camera's eyepiece, the simplest way is to cover it up. On the rear side of the case, glue or tape down a piece of cardboard or plastic over the opening. It won't change the ridge of the opening, but it will present a surface to paint over. To make it perfect, I'd guess the best method would be to use resin to fill the opening afterward, let dry, sand it down, and then paint over the top. But since the box is going to be black and the attention minimal, I decided a small ridge wasn't going to be critical. So sue me for a slight shortcut past true authenticity.

The next step is to spray paint a layer of silver. Be thorough on this layer, so that it covers up any underlying colors. Use multiple coats if needed, and be patient for drying between times.

Next, spray paint a layer of black. This is trickier because you still want some of the silver to show through on the edges, and here and there to show it's been used a lot. As soon as you do a coat of black, wipe the edges with a piece of sponge or napkin to remove the excess black paint. This should allow the silver to pop on the edges, to give that impression that the edges have been worn from handling and use. Being a little less careful on the spraying, a few scratches or extra wipes, are all part of the "weathering" process. It's also a great excuse for a mistake or two. Look, it's building character!

Heck, even comparing attempt one and two is a little uneven, but that's OK. Once you're satisfied, add a top coat or two of clear coat enamel.

Next, these dropboxes need to be able to attach to the belt. On the smartphone cases I purchased there were gaps along the bottom edge left for buttons, so I went ahead and snipped it a little more open to accommodate a strap. This was easy enough to do after painting since the material on mine is more flexible, but if you're trying this with a hard material casing I'd be careful of cracking and do this before painting.
If you look closely at the reference pictures, it appears they are attached by a strap of webbing or something leather-like. I cut two straps measuring 3/4 inch by 7 inch each from a thick upholstery "leather" vinyl, which acts much more like leather than some of the other "leather" vinyl fabrics I have.

Next, I decided to use a snap on each strap so that the dropboxes can be removed and attached easily. Fix the snaps as they appear below, so that they will snap together to form a loop.

As the snaps are not visible in the reference images, I maneuvered them so that they would be hidden on the inside of the belt (inside meaning the side against your clothing). To make sure that they will not slip around where we can see them, I added a few stitches to permanently fix where the dropbox is attached to the strap. Here's the positioning I mean, looking at the "inner" side of the belt.

And here's a close-up of where I'm adding the stitches, so the loop won't shift around.

This is what they should look like afterwards, though I'd hope your stitchery is much more regular and neat than mine.

Finally I decided to reinforce the area where the loop attaches to the dropbox. There's a lot of open space on the edge, so I wanted to make sure the loop wasn't easy to rip through the edge of the case. All I did was fill it up with hot glue.

3. Make the back pouch
Cut a piece of "leather" vinyl to the dimensions of 12 by 14 inches. Along one of the 12 inch edges, round the corners.

Fold the fabric so that the 14 inch length is shorter. Sew a running stitch about 1/2 inch from the edge for about 6 inches on either side. This will form the pouch when turned right-side out, and stitching it this way will conceal the stitches.

Then turn the pouch so that the "leather"-side is out.
 Then you have to figure out how the pouch will be attached to the belt. The reference images do not show any belt loops, but that's how I decided to go. You need at least two loops to prevent it from flapping around on the belt, but I added a third to support the middle as well. To make the loops, cut three 3/4 inch by 5 inch straps. I then used a hole punch and rivets to attach the loops.
 Here's a closer look of how those loops should be attached. Close to the top of the pouch, not on the flap.
 Finally you need a way to keep the flap of the pouch shut. Velcro was a simple solution, I used the pre-cut adhesive squares without any issues.
 And thus there's a pouch for the back of the belt. It's not a complete duplicate, but the size and proportions I think can pass.

4. Modify the belt
The last part is to modify the belt to match the one in the reference image. You can buy a very basic 2inch nylon webbing belt at the larger home improvement stores, costs about $6 and can be found in the section with the work belts, gloves, and other clothing/protective gear. The key difference is a rectangular silver slide buckle just to the right of the back pouch.


Next cut the belt at that mark. With a match or lighter, singe the cut ends so that the plastic in them will melt slightly. This will prevent the ends from fraying.

Then fold the cut ends of the belt around the ends of the slide buckle. The ends should be folded to the "inside" of the belt so that they will be hidden. Then do a quick running stitch with dark thread along both sides to secure the ends in place. The picture below has a red dotted line of where the stitch should be.

And there you have it, a belt that would work for the "rebel version" of Iden Versio, featuring dropboxes, back pouch, and silver buckle. As the leg harness is listed as a separate piece, I should be able to write that up as a separate article soon. Good luck and keep crafting!


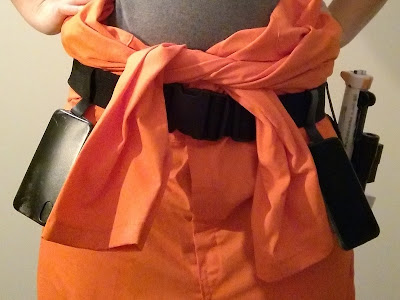


Inspiration/Reference Images

Materials
-Basic black 2inch "quick-release" belt
-Two basic smartphone cases
-Silver metallic spray paint
-Black spray paint (matte or satin)
-Clear coat enamel spray paint
-Black "leather" upholstery fabric
-Large rectangular silver slide buckle
Tools
-Scissors
-Hot glue gun
-Needle/thread
-Rivet/hole punch tool
1. Gather the materials
For this project I picked up parts from lots of places. From the hardware store I got the basic utility belt and spray paint. From a dollar store I found some basic clear smartphone cases, and from the craft store I found a nice thick "leather" upholstery fabric in the remnants pile. The hardest find was to get just the right buckle. Costumer Lady Mary custom-made her own metal slide buckles, but since I don't quite have the tools or the skills I relied on the fates of the thrift stores. And what do you know, fortune shone on me and I found a belt with 8 silver slide buckles for $5. It's not as flattened out as the one in the reference image, but the shape and look is pretty close.
2. Making the dropboxes
The "dropboxes" are two items worn on front side of the belt with indeterminate purpose. Stormtroopers carry something similar that appears as white plastic, but I can't find much that actually states what they area. Fortunately they are not difficult to simulate. Close-up shots make them hard-sided, around the size of a smartphone, and make them appear matte black with silver showing around the edges. This would suggest they are metallic, with the underlying metal showing through on points of hard wear, kind of like a E-11 blaster would. Start with the simple smartphone case. When finding them, go for the plainer the better. A case that is untextured, has relatively hard sides and minimal cut outs ideal.


For any holes left in the case, usually left for a camera's eyepiece, the simplest way is to cover it up. On the rear side of the case, glue or tape down a piece of cardboard or plastic over the opening. It won't change the ridge of the opening, but it will present a surface to paint over. To make it perfect, I'd guess the best method would be to use resin to fill the opening afterward, let dry, sand it down, and then paint over the top. But since the box is going to be black and the attention minimal, I decided a small ridge wasn't going to be critical. So sue me for a slight shortcut past true authenticity.

The next step is to spray paint a layer of silver. Be thorough on this layer, so that it covers up any underlying colors. Use multiple coats if needed, and be patient for drying between times.

Next, spray paint a layer of black. This is trickier because you still want some of the silver to show through on the edges, and here and there to show it's been used a lot. As soon as you do a coat of black, wipe the edges with a piece of sponge or napkin to remove the excess black paint. This should allow the silver to pop on the edges, to give that impression that the edges have been worn from handling and use. Being a little less careful on the spraying, a few scratches or extra wipes, are all part of the "weathering" process. It's also a great excuse for a mistake or two. Look, it's building character!

Heck, even comparing attempt one and two is a little uneven, but that's OK. Once you're satisfied, add a top coat or two of clear coat enamel.

Next, these dropboxes need to be able to attach to the belt. On the smartphone cases I purchased there were gaps along the bottom edge left for buttons, so I went ahead and snipped it a little more open to accommodate a strap. This was easy enough to do after painting since the material on mine is more flexible, but if you're trying this with a hard material casing I'd be careful of cracking and do this before painting.
If you look closely at the reference pictures, it appears they are attached by a strap of webbing or something leather-like. I cut two straps measuring 3/4 inch by 7 inch each from a thick upholstery "leather" vinyl, which acts much more like leather than some of the other "leather" vinyl fabrics I have.

Next, I decided to use a snap on each strap so that the dropboxes can be removed and attached easily. Fix the snaps as they appear below, so that they will snap together to form a loop.

As the snaps are not visible in the reference images, I maneuvered them so that they would be hidden on the inside of the belt (inside meaning the side against your clothing). To make sure that they will not slip around where we can see them, I added a few stitches to permanently fix where the dropbox is attached to the strap. Here's the positioning I mean, looking at the "inner" side of the belt.

And here's a close-up of where I'm adding the stitches, so the loop won't shift around.

This is what they should look like afterwards, though I'd hope your stitchery is much more regular and neat than mine.

Finally I decided to reinforce the area where the loop attaches to the dropbox. There's a lot of open space on the edge, so I wanted to make sure the loop wasn't easy to rip through the edge of the case. All I did was fill it up with hot glue.

3. Make the back pouch
Cut a piece of "leather" vinyl to the dimensions of 12 by 14 inches. Along one of the 12 inch edges, round the corners.

Fold the fabric so that the 14 inch length is shorter. Sew a running stitch about 1/2 inch from the edge for about 6 inches on either side. This will form the pouch when turned right-side out, and stitching it this way will conceal the stitches.

Then turn the pouch so that the "leather"-side is out.


4. Modify the belt
The last part is to modify the belt to match the one in the reference image. You can buy a very basic 2inch nylon webbing belt at the larger home improvement stores, costs about $6 and can be found in the section with the work belts, gloves, and other clothing/protective gear. The key difference is a rectangular silver slide buckle just to the right of the back pouch.

The placement of the silver buckle is going to differ depending on the length of the belt, so it'll differ from person to person. After trying on the belt with the beltboxes, holsters, and back pouch, I was able to figure that the buckle should be about 15 inches from the right side of the belt (right side meaning from the perspective from the person wearing it).

Next cut the belt at that mark. With a match or lighter, singe the cut ends so that the plastic in them will melt slightly. This will prevent the ends from fraying.

Then fold the cut ends of the belt around the ends of the slide buckle. The ends should be folded to the "inside" of the belt so that they will be hidden. Then do a quick running stitch with dark thread along both sides to secure the ends in place. The picture below has a red dotted line of where the stitch should be.

And there you have it, a belt that would work for the "rebel version" of Iden Versio, featuring dropboxes, back pouch, and silver buckle. As the leg harness is listed as a separate piece, I should be able to write that up as a separate article soon. Good luck and keep crafting!


Comments
Post a Comment