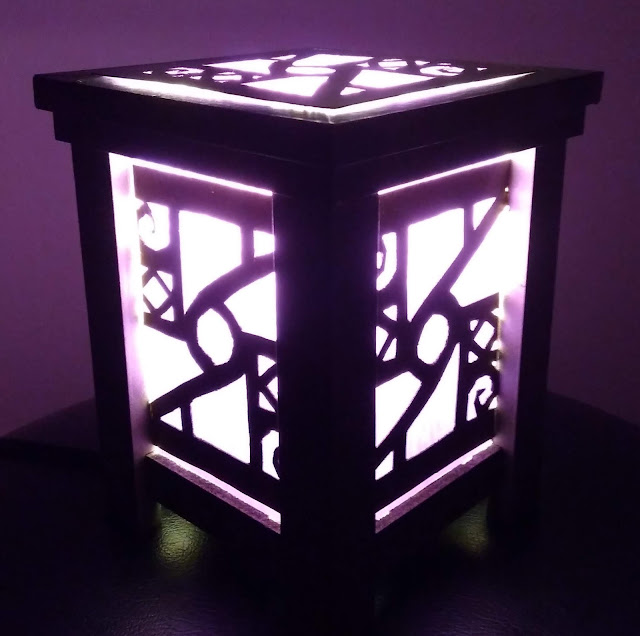
How to make a simple holocron from table lamp
Holocrons have not yet been mentioned in the Star Wars films, but they are a recurring Maguffin in the Clone Wars series, novels, video games like Star Wars The Old Republic, and comics. Though they don't quite have the iconic status of a lightsaber, holocrons can be fascinating props that double as lamps, nightlights, USB chargers, etc. Although there are fantastically skilled people who have made their own versions, I decided to make a very simple an unique holocron made from a small table lamp I found in a thrift store and school supplies purchased from a dollar store.
And with a close-up on the details:

And in the daylight, this:

As these items have never been depicted in a live-action medium, levels of detail vary depending on the maker. There are several online sources where you can purchase finished holocrons or holocron kits, and even now it seems Disney is joining in on the merchandising opportunities.
Inspirations


 Materials
-Lantern-type desk lamp
-Plastic flexible binder
-Plastic report cover
-Gold spray paint
-Clear coat enamel spray paint
-Thin cardboard
-LED lightbulb
Tools
-Scissors
-Hobby knife
-Permanent marker
-Tape measure
1. Gather the materials
I found this lantern-style decorative lamp in a thrift store for $2, and while you may not be able to find exactly the same lamp it's not an uncommon style to find in with cheap furniture in department stores. The binder and report covers can be bought easily at a dollar store. And of course the spray paints can be purchased at a home improvement or craft store. For the lantern light, I highly recommend using an LED bulb, as it will create much less heat than an incandescent bulb. This is good, as I would hate to see the plastic pieces of the holocron melt into a puddle.

2. Cut the color panels
Measure the dimensions of the side panels and the top. These panels will be fitted into the outside of the lantern.

3. Make the texture layer
To give the holocron some extra texture and depth, I created a maze template on a piece of scrap cardboard.

Then I cut pieces from the transparent report cover with the dimensions of the inside of the lantern, so that this texture would be hidden from a casual viewing. This would be four rectangular panels and a square top panel. I placed the plastic over the top of the template and traced the maze pattern onto the plastic pieces with a permanent marker.

4. Make the holocron pattern
Holocron patterns vary, but they tend to be geometric and stylized. If anything, the only other rule to keep it fitting in the Star Wars universe is to avoid using recognizably "Earth" symbols such as Celtic knots. Once I drew the design, I traced the designs on cardboard and cut out the negative space with a hobby knife.

Then I spray painted the patterns gold, let dry, and then added a top coat of clear coat enamel spray paint.
5. Rip out the cross-bars
With a pair of pliers I carefully pulled out the decorative cross-bars on this lantern. I checked very carefully to be sure these weren't actually holding the lantern together, I suggest you do the same!

6. Paint the lantern frame
To paint the frame gold, I first used masking tape to cover all the surfaces that really didn't need painting (the glass, cord, and top). I used the same gold spray paint as on the patterns. Finish with clear coat enamel spray paint.

7. Add the side panels
Insert the color panels into the frames. They fit pretty well on their own, but you could always use a little superglue to keep it in place.

I cut down the sides of this original pattern for the side panels so that they fit better. I'd originally created these patterns for a cubical holocron, so some modifications needed to be made. I fitted them in place and used a little superglue to keep them in place.

And then I slid the texture layers into place inside the lantern. The fit was snug enough that they didn't need to be glued into place.

8. Create the top panel
For this lantern, it originally came with a glass dish that served as the top cover. It doesn't really scream holocron, so instead I'm using the square purple plastic. I glued the texture layer to one side of the plastic.

And then glued the holocron pattern to the other side of the purple plastic.

I wanted to keep it removable, so it just rests on top of the lantern, though you could glue it into place or add a hinge if you wanted.

And there you have it, a very budget-friendly custom holocron that doubles as a decorative lamp. You can up your game by using metallic leaf rather than paint, or cutting patterns into aluminum for more precise lines. But this goes to show that with some basic materials and techniques you can transform a cheap, boring light fixture into a Force-imbued artifact. Good luck and keep crafting!


And with a close-up on the details:

And in the daylight, this:

As these items have never been depicted in a live-action medium, levels of detail vary depending on the maker. There are several online sources where you can purchase finished holocrons or holocron kits, and even now it seems Disney is joining in on the merchandising opportunities.
 |
| Examples of Disney-made holocrons, whose colors can be changed by exchanging different "crystals" |


-Lantern-type desk lamp
-Plastic flexible binder
-Plastic report cover
-Gold spray paint
-Clear coat enamel spray paint
-Thin cardboard
-LED lightbulb
Tools
-Scissors
-Hobby knife
-Permanent marker
-Tape measure
1. Gather the materials
I found this lantern-style decorative lamp in a thrift store for $2, and while you may not be able to find exactly the same lamp it's not an uncommon style to find in with cheap furniture in department stores. The binder and report covers can be bought easily at a dollar store. And of course the spray paints can be purchased at a home improvement or craft store. For the lantern light, I highly recommend using an LED bulb, as it will create much less heat than an incandescent bulb. This is good, as I would hate to see the plastic pieces of the holocron melt into a puddle.

2. Cut the color panels
Measure the dimensions of the side panels and the top. These panels will be fitted into the outside of the lantern.

3. Make the texture layer
To give the holocron some extra texture and depth, I created a maze template on a piece of scrap cardboard.

Then I cut pieces from the transparent report cover with the dimensions of the inside of the lantern, so that this texture would be hidden from a casual viewing. This would be four rectangular panels and a square top panel. I placed the plastic over the top of the template and traced the maze pattern onto the plastic pieces with a permanent marker.

4. Make the holocron pattern
Holocron patterns vary, but they tend to be geometric and stylized. If anything, the only other rule to keep it fitting in the Star Wars universe is to avoid using recognizably "Earth" symbols such as Celtic knots. Once I drew the design, I traced the designs on cardboard and cut out the negative space with a hobby knife.

Then I spray painted the patterns gold, let dry, and then added a top coat of clear coat enamel spray paint.
With a pair of pliers I carefully pulled out the decorative cross-bars on this lantern. I checked very carefully to be sure these weren't actually holding the lantern together, I suggest you do the same!

6. Paint the lantern frame
To paint the frame gold, I first used masking tape to cover all the surfaces that really didn't need painting (the glass, cord, and top). I used the same gold spray paint as on the patterns. Finish with clear coat enamel spray paint.

7. Add the side panels
Insert the color panels into the frames. They fit pretty well on their own, but you could always use a little superglue to keep it in place.

I cut down the sides of this original pattern for the side panels so that they fit better. I'd originally created these patterns for a cubical holocron, so some modifications needed to be made. I fitted them in place and used a little superglue to keep them in place.

And then I slid the texture layers into place inside the lantern. The fit was snug enough that they didn't need to be glued into place.

8. Create the top panel
For this lantern, it originally came with a glass dish that served as the top cover. It doesn't really scream holocron, so instead I'm using the square purple plastic. I glued the texture layer to one side of the plastic.

And then glued the holocron pattern to the other side of the purple plastic.

I wanted to keep it removable, so it just rests on top of the lantern, though you could glue it into place or add a hinge if you wanted.

And there you have it, a very budget-friendly custom holocron that doubles as a decorative lamp. You can up your game by using metallic leaf rather than paint, or cutting patterns into aluminum for more precise lines. But this goes to show that with some basic materials and techniques you can transform a cheap, boring light fixture into a Force-imbued artifact. Good luck and keep crafting!


Comments
Post a Comment