How to make a great lightsaber prop hilt on a budget
While building or purchasing a screen-ready full-bladed lightsaber is quite an endeavor, sometimes all you need is the hilt. With that in mind, I've experimented with materials and methods to create my very own lightsaber prop hilt. It's great for use in Jedi costumes, as it's light enough to clip onto the utility belt. For photo shoots it's relatively easy to photoshop in the blade of the lightsaber, and it's convincing enough that it can pass muster in registering a Jedi costume in Rebel Legion. This build is very cheap, simple to do, and can really be unique. Using the pop-up sink drain assembly is an idea I borrowed from many prop-builders before me, though I mostly took direction from Happy Trooper. The basics of construction aren't new, I wanted to show that there's a lot of room for customization without needing expensive tools or materials.
Inspirations
Canon lightsabers in Episodes 1-6

Extended universe lightsabers

Essential Materials
-Pop-up sink drain assembly ($8)
-Napkin rings ($1 for 8 rings from a thrift store)
-Leather/vinyl remnants
-Adjustable plumber's clamp ($3 for 2)
-D-ring
-Jewelry wire
Optional Materials
-Marbles
-"Cog" disc
-Button switch
-Stones, shells, beads
-Metal scraps, assorted "greeblies" (aka random hardware)
-Metallic spray paint
-Clear coat enamel spray paint
Tools
-Scissors
-Superglue
-Electrical tape
-Wood-burner
-Wire cutters
-Needlenose pliers
-Dremel tool (optional)
1. Design the saber
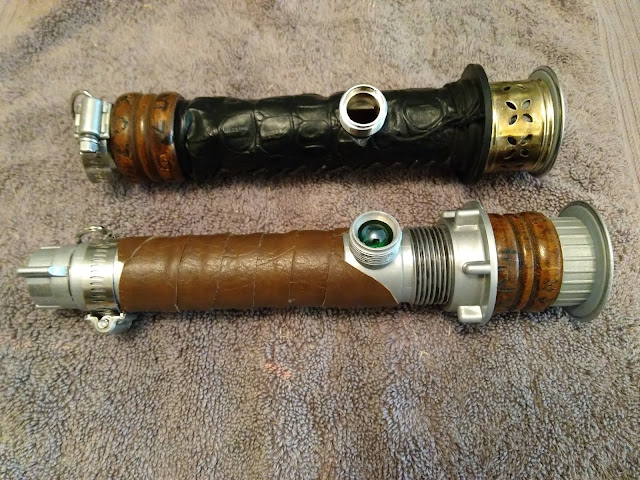
When designing your own prop hilt, there are a lot of different ways you can go about it. In the Star Wars canon (seen especially in episodes of The Clone Wars) lightsabers were extremely personalized. Padawans would choose their own materials, and only rarely inherited a lightsaber. In the films you generally see them being made from metal with rubber embellishments, but you can easily incorporate other elements like leather, wood, bone, and stone. For my first prop hilt, I used wood, metal, faux black crocodilian leather, and a chunk of amber. I liked the idea of using a mixture of more natural, unusual materials.

2. Gather the materials
You can pick up these materials from hardware and thrift stores. The basis of the hilt can be found in the plumbing section of the hardware store, called a pop-up drain sink assembly. There should be several types, what you probably want is the plastic assemblies with fake chrome plating, which runs about $8 to $10. You can also purchase the plumbing clamps here for very little, and find other odds and ends like buttons or switches for activation studs, etc.
I bought most of the other supplies at a craft store. D-rings can be found in the sewing notions, leather vinyl in fabrics, leather in leatherworking, jewelry wire and cordage in the beading section.
3. Prep the sink drain assembly
First disassemble the pop-up sink drain assembly

Remove any stickers and clean off any residue. Separate the parts shown below and spray paint them metallic silver if you like. The "chrome" is a bit too shiny for me, so I used the paint to tone it down. Finish off with a layer of clear coat enamel spray paint.

4. Decorating the napkin ring
For my hilt, I did some additional weathering and modification to the napkin rings. For my original prop hilt the metal napkin ring started out very shiny, so to weather it I held it over a burning candle with the needlenose pliers. Of course, be careful with the candle and the heated napkin ring. The soot and heat from the candle slightly tarnished and discolored the ring, making it look like there might have been heat damage from battle. To the wooden napkin ring I added lettering. Since I had a woodburning tool, I used it to burn words in the Star Wars script Aurebesh. Some other options to customize a wooden napkin ring could be to carve, paint, or woodburn geometric patterns. I used the woodburning method on both prop hilts. I write Aurebesh a bit like a Coruscant kindergartner, but simple short words like still work pretty well. To come up with your own inscriptions, there are plenty of Aurebesh translators online (here's one example).

For this particular wooden napkin ring to fit over the threading at the top of the drain assembly, I had to carve out the inside using the sanding drum of my Dremel. A bit time-consuming, but doable.

5. Assembling the emitter
The part where the blade would come out is generally called the "emitter". For this build, I used two pieces from the pop-up sink drain assembly. First I screwed on the nut down far enough so that the napkin ring would have enough room. Then I slipped on the napkin ring, and then screwed on the flange. You can experiment with different parts included in the kit, like using the gasket, but here's what mine looks like at this point.

6. Creating the hilt wrap
You can skip this step altogether if your are leaning towards the traditional metal-and-rubber designs seen in the Skywalker lightsabers. But I like adding a nice leather grip element, it makes it more comfortable to hold and hearkens back to traditional swords. You can do the hilt wrapping a couple different ways. In my first prop hilt, I cut a rectangular section of faux leather vinyl. You could glue it into place, but I chose to cinch it around the hilt using laces. To use laces, punch a series of holes along two edges, then use some matching cord to lace it up like a shoe. Here's a close-up of that first hilt to see what I mean:

But for this second prop hilt I decided on something closer to traditional wrapping of sword hilts. I cut a strip of leather, dimensions 1foot long by 1inch wide. The leather was leftover from a thrift store purse. You can use electrical trap or superglue to attach one end just below where the "activation button" would be, and tightly wrap the hilt in an overlapping spiral.


To cover up a decal on the drain assembly, I used a couple extra bits of leather to make it a design choice rather than just a cover up. After all, if really pressed you can always just sand off the decal. But I liked this look on a saber someone had made, I'm not sure the source but it's awesome.

The overlapping "shrouded" emitter and pommel and the marble as a pommel stone are also ridiculously fantastic, and a great example of what a true craftsperson can do with more sophisticated tools. But I also like how the wrap isn't completely linear, the upper edge of the wrap counteracts the curves in the shrouded emitter. Inspired by this approach at hilt wrapping, I added a few bits of leather strategically on my own hilt.

So it was place over the decal, and then on the other side of the "switch" a matching piece was also attached. This other piece is a bit large, made to flow into the wrapping of the rest of the hilt. It took a little experimentation to make it fit well with the rest of the wrapping, but not a difficult task.

7. Adding the belt attachment
Lightsabers are worn on a belt like a sword (usually on the hip of the nondominant hand), but unlike a sword there's no scabbard to keep it in. In the original trilogy there's a hook on the belt, and the lightsaber has a D-ring type attachment to slide over the hook, which is the simplest method to replicate. All you need is an adjustable plumbing clamp, a D-ring, and some thin jewelry wire.

With two lengths of wire, attach the D-ring at two points to the clamp. It doesn't need to be fancy wirework (the Force knows my technique isn't), it just needs to be fixed in place and the ends tucked away so they don't scratch the user or unravel.

Adjust the clamp in place on the hilt. Try it in different rotations to see which will interfere the least with your grip. Also keep in mind that anything on the same side as the D-ring will not be seen when hung on a belt. Anyway, here's what it should look like.

8. Creating the pommel piece
The "pommel" is basically the bottom of the lightsaber, just as the pommel is the bottom-most part of a sword's hilt. On a sword, it acts as a kind of counterweight to the blade and a way to keep the hand from slipping off the grip. On a lightsaber it helps define where to grip the hilt, but also gives another opportunity for a decorative element. For this, I used the nut that goes on the side of the drain assembly (usually referred to as a pivot seat I think) and a weird little wheel disc piece that I found in a craft store. It's sort of steampunk, I think I found it in either the jewelry or scrapbooking sections. Anyway, it was something just lying around, and by chance it is exactly the same diameter as the nut.

I glued the disc to the bottom of the nut.

As you can see here:

Once dry, I then glued the pommel to the end of the hilt.

Here's another view of it, to show how the little disc piece adds another neat detail.

9. Finishing touches
Really you can stop there, but I wanted to add a few other details that I hadn't on my first prop hilt. First I added a bit of contrast on the threads on the hilt. I added some black acrylic paint on the bottom of the threads, just to add a little more depth and detail to it. I actually added this earlier, you can see it in some of the earlier pictures of the hilt wrapping. Any excess black paint can be wiped off with a cloth, so that the contrast is kept between the silver on the top of the thread and the black at the bottom of the grooves.

And for activation switch, I just inserted a green marble to resemble a button. It was just the right size, it didn't need any glue to keep it in place.

And there you have it, a budget-friendly lightsaber hilt made from a few plumbing parts and some scrap craft supplies. I always like playing with props and costumes in the Star Wars universe, and the lightsaber hilt offers yet another opportunity for a prop to tell a story about the character who holds it. Enjoy tinkering with different materials and ideas, there are undoubtedly countless combinations and at least one that will speak to you. Good luck and keep crafting!


Other Lightsaber Hilt Tutorials

Inspirations
Canon lightsabers in Episodes 1-6

Extended universe lightsabers

Essential Materials
-Pop-up sink drain assembly ($8)
-Napkin rings ($1 for 8 rings from a thrift store)
-Leather/vinyl remnants
-Adjustable plumber's clamp ($3 for 2)
-D-ring
-Jewelry wire
Optional Materials
-Marbles
-"Cog" disc
-Button switch
-Stones, shells, beads
-Metal scraps, assorted "greeblies" (aka random hardware)
-Metallic spray paint
-Clear coat enamel spray paint
Tools
-Scissors
-Superglue
-Electrical tape
-Wood-burner
-Wire cutters
-Needlenose pliers
-Dremel tool (optional)
1. Design the saber
When designing your own prop hilt, there are a lot of different ways you can go about it. In the Star Wars canon (seen especially in episodes of The Clone Wars) lightsabers were extremely personalized. Padawans would choose their own materials, and only rarely inherited a lightsaber. In the films you generally see them being made from metal with rubber embellishments, but you can easily incorporate other elements like leather, wood, bone, and stone. For my first prop hilt, I used wood, metal, faux black crocodilian leather, and a chunk of amber. I liked the idea of using a mixture of more natural, unusual materials.

But since I didn't manage to take any pictures during this project and I was thinking of making a second prop hilt anyway, here we go again!
You can pick up these materials from hardware and thrift stores. The basis of the hilt can be found in the plumbing section of the hardware store, called a pop-up drain sink assembly. There should be several types, what you probably want is the plastic assemblies with fake chrome plating, which runs about $8 to $10. You can also purchase the plumbing clamps here for very little, and find other odds and ends like buttons or switches for activation studs, etc.
I bought most of the other supplies at a craft store. D-rings can be found in the sewing notions, leather vinyl in fabrics, leather in leatherworking, jewelry wire and cordage in the beading section.
3. Prep the sink drain assembly
First disassemble the pop-up sink drain assembly

Remove any stickers and clean off any residue. Separate the parts shown below and spray paint them metallic silver if you like. The "chrome" is a bit too shiny for me, so I used the paint to tone it down. Finish off with a layer of clear coat enamel spray paint.

4. Decorating the napkin ring
For my hilt, I did some additional weathering and modification to the napkin rings. For my original prop hilt the metal napkin ring started out very shiny, so to weather it I held it over a burning candle with the needlenose pliers. Of course, be careful with the candle and the heated napkin ring. The soot and heat from the candle slightly tarnished and discolored the ring, making it look like there might have been heat damage from battle. To the wooden napkin ring I added lettering. Since I had a woodburning tool, I used it to burn words in the Star Wars script Aurebesh. Some other options to customize a wooden napkin ring could be to carve, paint, or woodburn geometric patterns. I used the woodburning method on both prop hilts. I write Aurebesh a bit like a Coruscant kindergartner, but simple short words like still work pretty well. To come up with your own inscriptions, there are plenty of Aurebesh translators online (here's one example).

For this particular wooden napkin ring to fit over the threading at the top of the drain assembly, I had to carve out the inside using the sanding drum of my Dremel. A bit time-consuming, but doable.

5. Assembling the emitter
The part where the blade would come out is generally called the "emitter". For this build, I used two pieces from the pop-up sink drain assembly. First I screwed on the nut down far enough so that the napkin ring would have enough room. Then I slipped on the napkin ring, and then screwed on the flange. You can experiment with different parts included in the kit, like using the gasket, but here's what mine looks like at this point.

6. Creating the hilt wrap
You can skip this step altogether if your are leaning towards the traditional metal-and-rubber designs seen in the Skywalker lightsabers. But I like adding a nice leather grip element, it makes it more comfortable to hold and hearkens back to traditional swords. You can do the hilt wrapping a couple different ways. In my first prop hilt, I cut a rectangular section of faux leather vinyl. You could glue it into place, but I chose to cinch it around the hilt using laces. To use laces, punch a series of holes along two edges, then use some matching cord to lace it up like a shoe. Here's a close-up of that first hilt to see what I mean:

But for this second prop hilt I decided on something closer to traditional wrapping of sword hilts. I cut a strip of leather, dimensions 1foot long by 1inch wide. The leather was leftover from a thrift store purse. You can use electrical trap or superglue to attach one end just below where the "activation button" would be, and tightly wrap the hilt in an overlapping spiral.

At the very end of the wrap, cut the end so that it tapers to a triangular end so that it ends evenly. Use a few drops of superglue to affix the end.

To cover up a decal on the drain assembly, I used a couple extra bits of leather to make it a design choice rather than just a cover up. After all, if really pressed you can always just sand off the decal. But I liked this look on a saber someone had made, I'm not sure the source but it's awesome.

The overlapping "shrouded" emitter and pommel and the marble as a pommel stone are also ridiculously fantastic, and a great example of what a true craftsperson can do with more sophisticated tools. But I also like how the wrap isn't completely linear, the upper edge of the wrap counteracts the curves in the shrouded emitter. Inspired by this approach at hilt wrapping, I added a few bits of leather strategically on my own hilt.

So it was place over the decal, and then on the other side of the "switch" a matching piece was also attached. This other piece is a bit large, made to flow into the wrapping of the rest of the hilt. It took a little experimentation to make it fit well with the rest of the wrapping, but not a difficult task.

7. Adding the belt attachment
Lightsabers are worn on a belt like a sword (usually on the hip of the nondominant hand), but unlike a sword there's no scabbard to keep it in. In the original trilogy there's a hook on the belt, and the lightsaber has a D-ring type attachment to slide over the hook, which is the simplest method to replicate. All you need is an adjustable plumbing clamp, a D-ring, and some thin jewelry wire.

With two lengths of wire, attach the D-ring at two points to the clamp. It doesn't need to be fancy wirework (the Force knows my technique isn't), it just needs to be fixed in place and the ends tucked away so they don't scratch the user or unravel.

Adjust the clamp in place on the hilt. Try it in different rotations to see which will interfere the least with your grip. Also keep in mind that anything on the same side as the D-ring will not be seen when hung on a belt. Anyway, here's what it should look like.

8. Creating the pommel piece
The "pommel" is basically the bottom of the lightsaber, just as the pommel is the bottom-most part of a sword's hilt. On a sword, it acts as a kind of counterweight to the blade and a way to keep the hand from slipping off the grip. On a lightsaber it helps define where to grip the hilt, but also gives another opportunity for a decorative element. For this, I used the nut that goes on the side of the drain assembly (usually referred to as a pivot seat I think) and a weird little wheel disc piece that I found in a craft store. It's sort of steampunk, I think I found it in either the jewelry or scrapbooking sections. Anyway, it was something just lying around, and by chance it is exactly the same diameter as the nut.

I glued the disc to the bottom of the nut.

As you can see here:

Once dry, I then glued the pommel to the end of the hilt.

Here's another view of it, to show how the little disc piece adds another neat detail.

9. Finishing touches
Really you can stop there, but I wanted to add a few other details that I hadn't on my first prop hilt. First I added a bit of contrast on the threads on the hilt. I added some black acrylic paint on the bottom of the threads, just to add a little more depth and detail to it. I actually added this earlier, you can see it in some of the earlier pictures of the hilt wrapping. Any excess black paint can be wiped off with a cloth, so that the contrast is kept between the silver on the top of the thread and the black at the bottom of the grooves.

And for activation switch, I just inserted a green marble to resemble a button. It was just the right size, it didn't need any glue to keep it in place.

And there you have it, a budget-friendly lightsaber hilt made from a few plumbing parts and some scrap craft supplies. I always like playing with props and costumes in the Star Wars universe, and the lightsaber hilt offers yet another opportunity for a prop to tell a story about the character who holds it. Enjoy tinkering with different materials and ideas, there are undoubtedly countless combinations and at least one that will speak to you. Good luck and keep crafting!


Other Lightsaber Hilt Tutorials


Fancy Silver tone Plastic Napkin Rings are great for adding a touch of elegance to any table setting. Perfect for sliding onto paper napkins or cloth napkins at family gatherings, weddings, receptions, reunions, and other large gatherings or regular use.
ReplyDelete