How to make Harry Dresden's shield bracelet
So because I'm a big fan of the most sarcastic modern wizard in urban fantasy I've been working on a Harry Dresden costume build. I have all of the clothing already, but the real trick is getting the accessories right. One of Dresden's mainstays, whether in the books, graphic novels, or TV, is a shield bracelet that deflects bullets, redirects energy, and otherwise saves his bacon at least once a story. But how to make such a lovely thing when you have no background in metalworking?
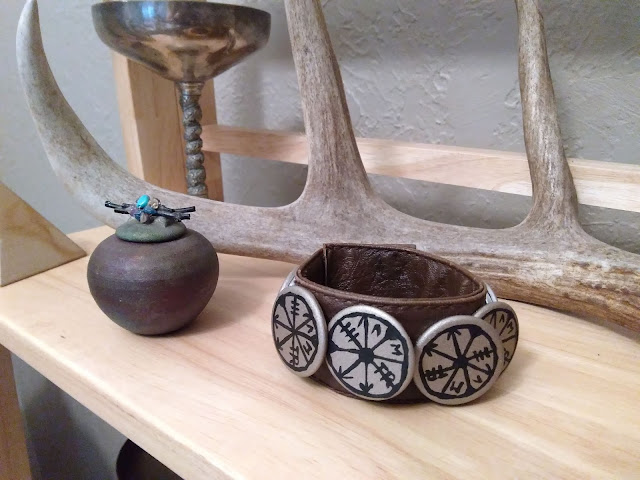
I chose to recreate the shield bracelet depicted in The Dresden Files rather than the typical charm bracelet. Why? Well first I actually like the design better. The leather cuff with overlapping round shields is reminiscent of something that felt workable in Merlin's time as well as the modern day. The silver charm bracelet looks kind of silly, like something you'd pick out from Pandora or some other mainstream jewelry store. It's less utilitarian as well, the charms would get caught on sleeves and be constantly in the way. I think either design can be a reasonable interpretation of the text, so I went with the one I liked better.

I chose to recreate the shield bracelet depicted in The Dresden Files rather than the typical charm bracelet. Why? Well first I actually like the design better. The leather cuff with overlapping round shields is reminiscent of something that felt workable in Merlin's time as well as the modern day. The silver charm bracelet looks kind of silly, like something you'd pick out from Pandora or some other mainstream jewelry store. It's less utilitarian as well, the charms would get caught on sleeves and be constantly in the way. I think either design can be a reasonable interpretation of the text, so I went with the one I liked better.

Materials
-7 button pins
-Gold/bronze spray paint
-Black acrylic paint
-Clear coat enamel spray paint
-2 sew-on straps
-2 sew-on straps
Tools
-Scissors
-Hobby knife
-Paintbrush
-Superglue
-Needle/thread
-Needle/thread
Reference Images


1. Gather the materials
I got these cheap button pins from Five Below, two sets of four buttons for about $4. The leather purse has some nice brown leather, I had already salvaged parts off it for a different project. And then the paints can be found at the hardware store (metallic spray paint, enamel clear coat) or really any craft store (acrylic paint).

2. Prep the shields
For the button pins, I used a hobby knife to scrape off the outer layers of plastic and paper to get to the metal beneath. Originally I tried engraving the sigils on the shield with a Dremel, but I couldn't get the precision and depth I wanted. When you remove the paper and plastic layers the pin can come apart into two pieces, the face and the pin backing. Not the end of the world, and actually it makes it easier to do the paint job.

3. Paint the shields
Next I spray-painted the "faces" of the button pins a metallic gold/bronze color. This is up to interpretation, as in the TV series they appear this color but in the books the metals shift over time and the latest version actually shields of different metals. But for this I chose to try to mimic the TV series bracelet.
After adding several coats and allowing to dry between coats, I began painting the sigils with black acrylic paint. This is not too difficult since the pattern is largely geometric, but if you wanted more precision you could always opt to make it a stencil. I allowed it to dry, then topped it all with a couple of coats of satin clear enamel spray paint to seal it.
4. Reattach the pins to the shields
Snap the pins back together, though you might need to bend the rims or add a little superglue to keep it together.
5. Cut the strap
From the leather bag cut the brown leather strap. Cut the strap down to a length that would about an inch longer than the circumference of your wrist.

6. Attach the snaps
To fasten the cuff closed, I chose to use a pair of sew-on snap fasteners to keep them better attached to the thick strap.


6. Attach the snaps
To fasten the cuff closed, I chose to use a pair of sew-on snap fasteners to keep them better attached to the thick strap.


6. Attach the shields to the strap
Finally, pin the shields to the bracelet so that they overlap slightly.

And there you have it, a budget build to recreate Harry Dresden's shield bracelet. Good luck and keep crafting!


Finally, pin the shields to the bracelet so that they overlap slightly.

And there you have it, a budget build to recreate Harry Dresden's shield bracelet. Good luck and keep crafting!


Comments
Post a Comment