How to steampunk an old weather station
Although devices for measuring weather were created centuries before, simple weather stations consisting of a thermometer, barometer, and hygrometer (measuring temperature, air pressure, and humidity) became more mass-produced in the 1800s, making them readily available to the scientists of the Victorian age.
I found a more modernly made weather station in a thrift store and in the spur of the moment decided it was in need of some help. Besides, my apartment is starting to look like a naturalist's den, so something like this would fit right in.
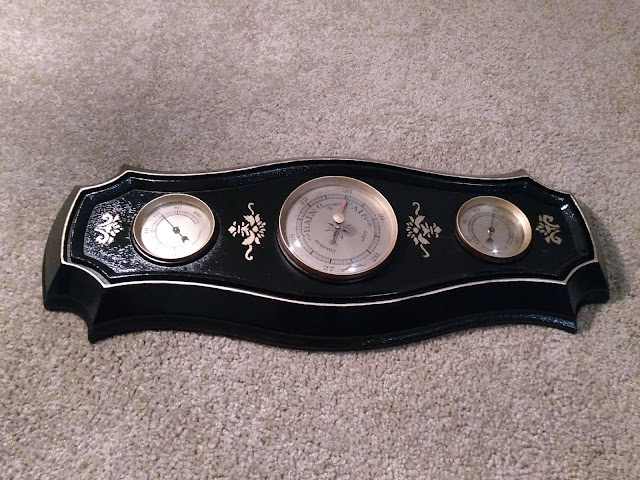
And this is the ugly duckling as it began. I know they're probably immensely collectible or something, but the dull fake wood and flaking gold paint don't help.

Materials
-Weather station or mounted weather instruments
-Black spray paint
-Gold paint marker
-Spray varnish
-Stiff paper or thin cardboard for stencil
-Hobby knife
1. Gather the materials
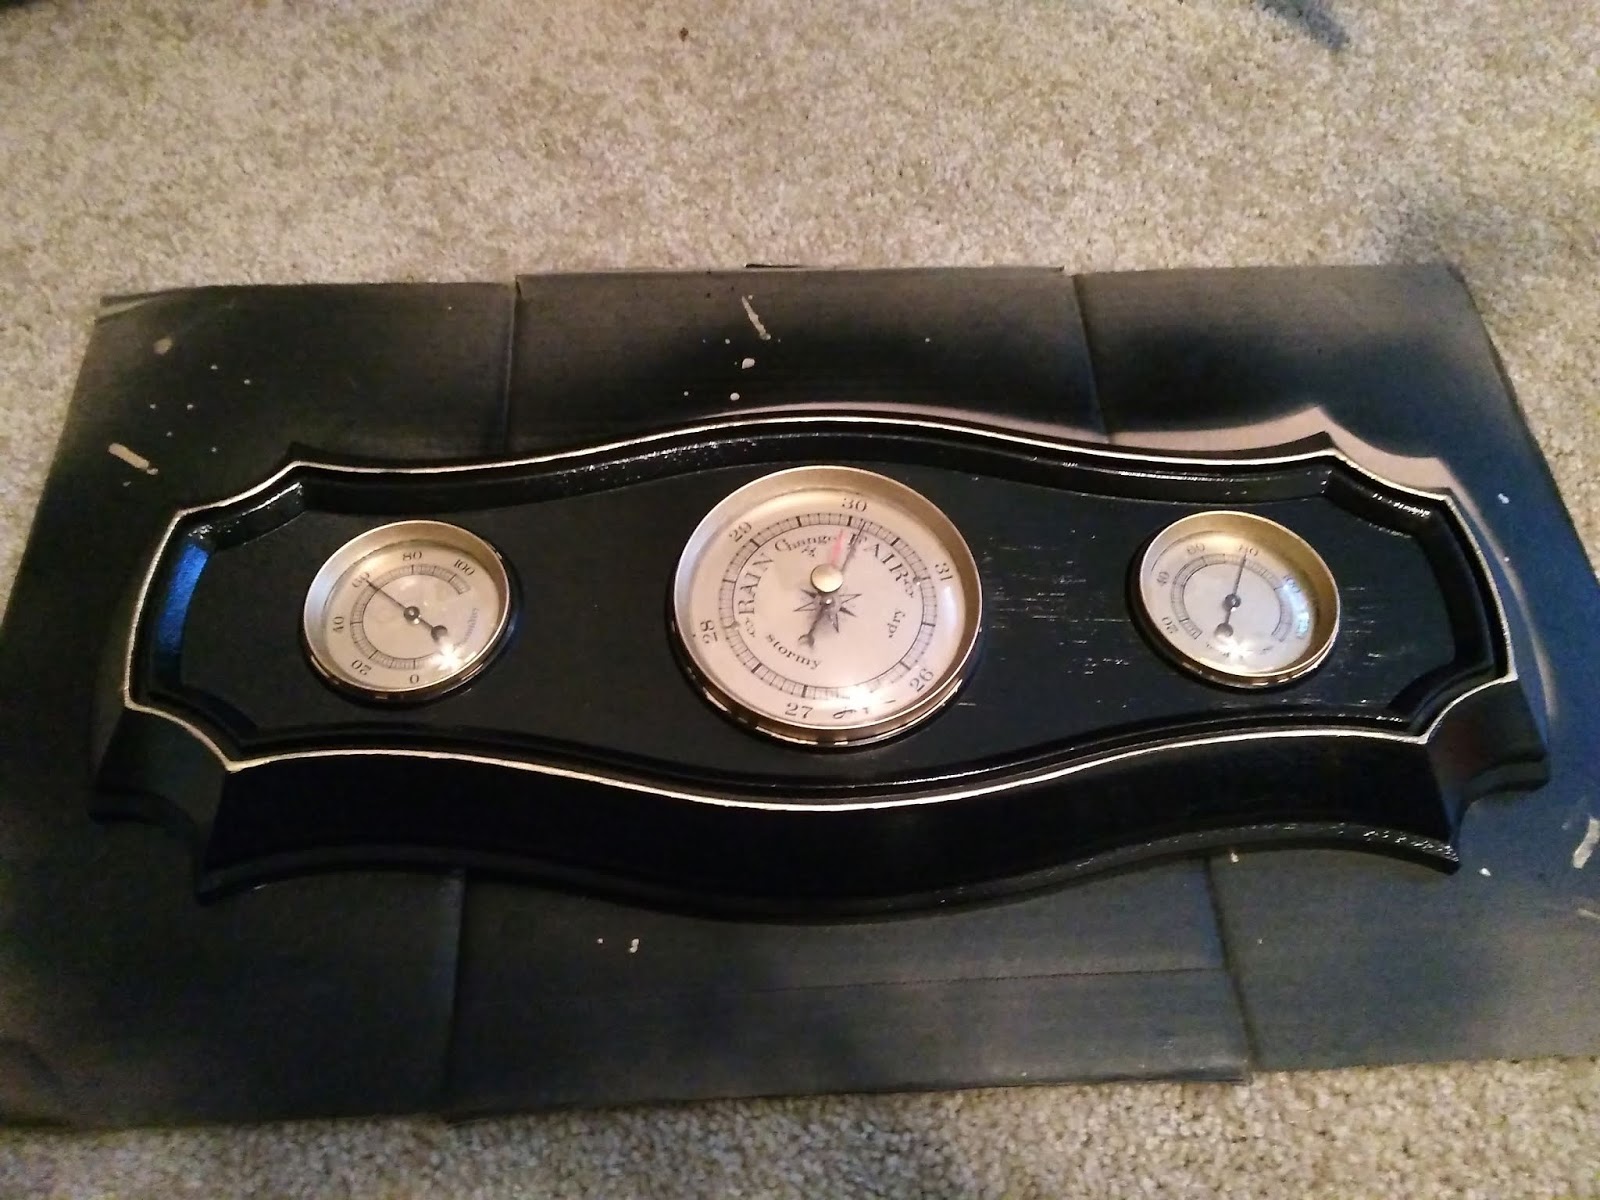
Turns out you can spend a lot of money on a weather station or very little. Lots of vintage weather stations in mint-condition are lovely and cost hundreds of dollars. I stumbled upon this wall-mounted weather station in a thrift store and bought it for $4. It's pretty damn ugly, made out of fake wood in a sort of 1970s style. But great potential for a steampunk revival.
The other materials can be easily purchased from home improvement and/or craft stores. You can go for the standard metallic gold paint for the detail work, but I found I liked the control and saturation I got with the paint marker.
2. Clean and prep
Always makes sense to clean anything you want to paint, since any residue can muck up the adhesion. Also it came from a thrift store, so dust and spiders are an issue. Since my first paint layer is the base black, I taped and covered the instruments. You could also just remove them, but with the fittings on mine I was afraid I'd bust them.

3. Base paint
I decided to abandon the "wood" look. It's obviously not wood, there's no attempt at a pattern and only slight texture, so might as well go with a color that would pop with the gold. So I applied a few layers of satin black spray paint. In the past I've been a bit impatient with waiting for it to dry properly, but to ensure it lost all it's tackiness I forced myself to wait a full 24 hours for it to dry.

4. Instrument paint
To bring out the gold rims of the instruments, I touched up the flaking paint job with a metallic gold paint marker. This part is probably easier if you remove the instruments from the plaque, but I was able to apply it without too much trouble. It's acrylic paint, so if it gets on the glass it can be removed with a damp paper towel and if it get's on the plaque it can be covered up with a bit of black paint or a Sharpie.

5. Detail paint
I really like the gold paint, so I edged a lip of the plaque with it to make the gold of the instruments pop a little more. I originally was going to do even more gold on the outermost edge, but decided not to go overboard.

6. Making stencils
Yeah I lied about the "going overboard". It's nice as it is, but I thought it'd be cool to go more into the Victorian theming. I could have gone with the traditional steampunk and added gears, but I like to think there's more to steampunk that putting gears and goggles all over everything. So I looked up Victorian era designs and found a lot of intricate wallpapers done up with stylized flower and leaf elements. You can buy whole books of actual Victorian wallpaper stencils online, but I decided to try to make my own stencils to save time and money. That way, I could also simplify the design to make it fit with the project. So I measured the spots I wanted to put stencils and then drew up some floral bits on some stiff drawing paper. I cut out the pieces with a hobby knife, which is a little more precise than a boxcutter or scissors.

7. Applying stencils
Finally I attached the stencils with some masking paint to their proper places. Using the gold paint marker, I filled in the stencils and then let dry. I repeated it on the other side to mirror the design, and then touched up any unevenness on the edges with some Sharpie.

8. Finish
To make sure the paint job doesn't flake off, it's a good idea to cover the glass of the instruments and then spray a layer of varnish over the whole thing. Otherwise, it's ready to go!


So if there's a moral to the story I guess it's that a worn-out, fake wood relic of the 1970s can, with a little imagination and paint, be spiffed up good as new and a bit Victorian all at once. Did I destroy a not-quite antique in the quest of making it look like it belongs in an even more antique time period? Well yeah, but it was fun so who cares? Good luck and happy crafting!
I found a more modernly made weather station in a thrift store and in the spur of the moment decided it was in need of some help. Besides, my apartment is starting to look like a naturalist's den, so something like this would fit right in.

And this is the ugly duckling as it began. I know they're probably immensely collectible or something, but the dull fake wood and flaking gold paint don't help.

Materials
-Weather station or mounted weather instruments
-Black spray paint
-Gold paint marker
-Spray varnish
-Stiff paper or thin cardboard for stencil
-Hobby knife
1. Gather the materials
Turns out you can spend a lot of money on a weather station or very little. Lots of vintage weather stations in mint-condition are lovely and cost hundreds of dollars. I stumbled upon this wall-mounted weather station in a thrift store and bought it for $4. It's pretty damn ugly, made out of fake wood in a sort of 1970s style. But great potential for a steampunk revival.
The other materials can be easily purchased from home improvement and/or craft stores. You can go for the standard metallic gold paint for the detail work, but I found I liked the control and saturation I got with the paint marker.
2. Clean and prep
Always makes sense to clean anything you want to paint, since any residue can muck up the adhesion. Also it came from a thrift store, so dust and spiders are an issue. Since my first paint layer is the base black, I taped and covered the instruments. You could also just remove them, but with the fittings on mine I was afraid I'd bust them.

3. Base paint
I decided to abandon the "wood" look. It's obviously not wood, there's no attempt at a pattern and only slight texture, so might as well go with a color that would pop with the gold. So I applied a few layers of satin black spray paint. In the past I've been a bit impatient with waiting for it to dry properly, but to ensure it lost all it's tackiness I forced myself to wait a full 24 hours for it to dry.

4. Instrument paint
To bring out the gold rims of the instruments, I touched up the flaking paint job with a metallic gold paint marker. This part is probably easier if you remove the instruments from the plaque, but I was able to apply it without too much trouble. It's acrylic paint, so if it gets on the glass it can be removed with a damp paper towel and if it get's on the plaque it can be covered up with a bit of black paint or a Sharpie.

5. Detail paint
I really like the gold paint, so I edged a lip of the plaque with it to make the gold of the instruments pop a little more. I originally was going to do even more gold on the outermost edge, but decided not to go overboard.
6. Making stencils
Yeah I lied about the "going overboard". It's nice as it is, but I thought it'd be cool to go more into the Victorian theming. I could have gone with the traditional steampunk and added gears, but I like to think there's more to steampunk that putting gears and goggles all over everything. So I looked up Victorian era designs and found a lot of intricate wallpapers done up with stylized flower and leaf elements. You can buy whole books of actual Victorian wallpaper stencils online, but I decided to try to make my own stencils to save time and money. That way, I could also simplify the design to make it fit with the project. So I measured the spots I wanted to put stencils and then drew up some floral bits on some stiff drawing paper. I cut out the pieces with a hobby knife, which is a little more precise than a boxcutter or scissors.

7. Applying stencils
Finally I attached the stencils with some masking paint to their proper places. Using the gold paint marker, I filled in the stencils and then let dry. I repeated it on the other side to mirror the design, and then touched up any unevenness on the edges with some Sharpie.

8. Finish
To make sure the paint job doesn't flake off, it's a good idea to cover the glass of the instruments and then spray a layer of varnish over the whole thing. Otherwise, it's ready to go!


Comments
Post a Comment