How to make a naturalist's bell jar display
Again, not exactly a steampunk craft project. No goggles or gears in sight. But if you're like me and you like the Victorian naturalist aesthetic, this is a simple craft project. I drew inspiration from the descriptions of the museums and private collections of Victorian naturalists and explorers, who gathered rare specimens and kept them for documentation and display. To keep taxidermied animals and insects in good condition, they were placed under the bell jars and cloches, which would help keep dust and moths at bay.
For example:


Materials
 -Bell jars
-Craft moss
-Stick
-Fake butterfly, bird, etc.
-Foam sphere
Tools
-Hobby knife
-Glue
1. Gather the materials
With a keen eye you are likely to find a number of bell jars in your local thrift store. They're these funny little glass cases that people can use to keep dust off of knick knacks, and come in a variety of sizes. I found one for 50 cents and the other for a dollar. Sometimes you can also find cloches, which are only different in that they come with a base and have no flaring at the bottom. I also found several candleholders that could serve as bell jar bases, or you can buy a cloche bottom from a craft store. The craft moss went for $4 a bag, though you don't need all that much. The fake butterflies ran about $3 for a 4-pack. The rest of this stuff I found in a craft store, although foam spheres can be harvested from dollar store buys and old toys. The stick was easy, just walk outside.
2. Cut up a sphere
To form the base to attach the display, I cut up a 1inch foam sphere left over from my snidget project. It has to have a circumference that will fit easily within the bell jar.

3. Add stick
First, poke a hole through the hemisphere with narrow pair of scissors or similar. Then cut down a stick to fit through the foam and within the bell jar. Impale the stick, and add a little glue if it's loose.

4. Add moss
To attach the moss, cover the curve of the hemisphere with a dries-clear craft glue, or hot glue. Then carefully press bits of craft moss into place. Allow to dry. For a more complete effect, paint the foam green first to hide any gaps in the moss.

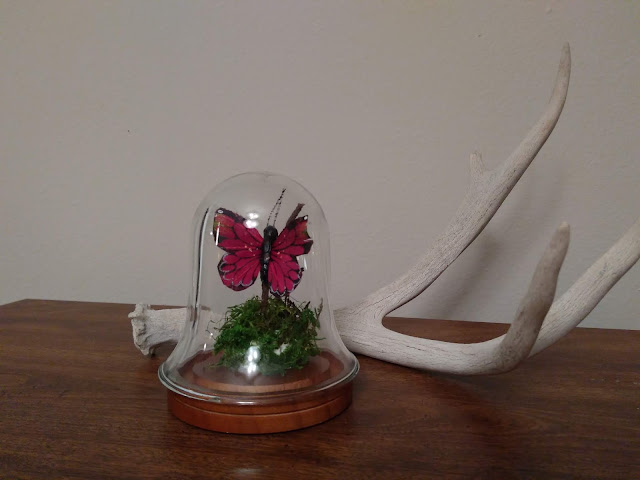
5. Add butterfly or other specimen
The key part of the bell jar display is the thing to be displayed. For the small display piece, I could only really go for something pretty small, like a butterfly or beetle. The craft butterflies can at a distance pass for the real thing, so that's what I used. You can also collect and preserve your own insects, or buy them online, but that wasn't really my goal for this project. Larger displays could hold fake birds, though most craft ones aren't all that convincing and might need additional touches to make them look like they were real.

6. Finish
Finally you position the foam and stick assembly on the base and cover with the bell jar. For the extra touch I went ahead and bought a cloche base for about $3, which fit well with this particular jar. It doesn't slide around, which is the goal. But you could easily use a simple candle-holder base for the same effect. Super simple, and a nice addition to any Victorian naturalist's study or Wunderkammer. You can steampunk it up if you wanted, using this same set-up to display a clockwork creature accented with metal details and gears.


Anyway, good luck and keep crafting!

For example:
Materials

-Craft moss
-Stick
-Fake butterfly, bird, etc.
-Foam sphere
Tools
-Hobby knife
-Glue
1. Gather the materials
With a keen eye you are likely to find a number of bell jars in your local thrift store. They're these funny little glass cases that people can use to keep dust off of knick knacks, and come in a variety of sizes. I found one for 50 cents and the other for a dollar. Sometimes you can also find cloches, which are only different in that they come with a base and have no flaring at the bottom. I also found several candleholders that could serve as bell jar bases, or you can buy a cloche bottom from a craft store. The craft moss went for $4 a bag, though you don't need all that much. The fake butterflies ran about $3 for a 4-pack. The rest of this stuff I found in a craft store, although foam spheres can be harvested from dollar store buys and old toys. The stick was easy, just walk outside.
2. Cut up a sphere
To form the base to attach the display, I cut up a 1inch foam sphere left over from my snidget project. It has to have a circumference that will fit easily within the bell jar.

3. Add stick
First, poke a hole through the hemisphere with narrow pair of scissors or similar. Then cut down a stick to fit through the foam and within the bell jar. Impale the stick, and add a little glue if it's loose.

4. Add moss
To attach the moss, cover the curve of the hemisphere with a dries-clear craft glue, or hot glue. Then carefully press bits of craft moss into place. Allow to dry. For a more complete effect, paint the foam green first to hide any gaps in the moss.

5. Add butterfly or other specimen
The key part of the bell jar display is the thing to be displayed. For the small display piece, I could only really go for something pretty small, like a butterfly or beetle. The craft butterflies can at a distance pass for the real thing, so that's what I used. You can also collect and preserve your own insects, or buy them online, but that wasn't really my goal for this project. Larger displays could hold fake birds, though most craft ones aren't all that convincing and might need additional touches to make them look like they were real.

6. Finish
Finally you position the foam and stick assembly on the base and cover with the bell jar. For the extra touch I went ahead and bought a cloche base for about $3, which fit well with this particular jar. It doesn't slide around, which is the goal. But you could easily use a simple candle-holder base for the same effect. Super simple, and a nice addition to any Victorian naturalist's study or Wunderkammer. You can steampunk it up if you wanted, using this same set-up to display a clockwork creature accented with metal details and gears.


Anyway, good luck and keep crafting!


Comments
Post a Comment