How to make a steampunk harness
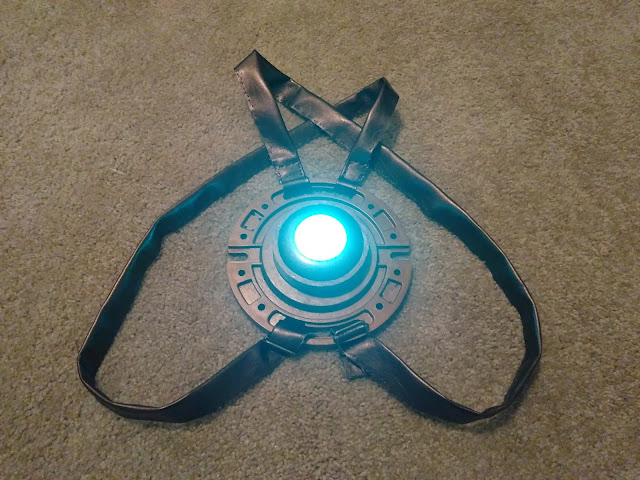
Every steampunk costume needs some sort of crazy device or gadget to set it apart from straight-up Victorian age cosplay. I had thoughts of making a headpiece or a bracer of some kind, but ultimately decided to try making a chest harness. Kind of a steampunk Iron-Man armature. My foray is pretty basic, but could be enhanced further with auxiliary LED lights, pouches on the straps, or using real leather to create a much more intricate harness. Anyway, here's my step-by-step guide to creating a simple light-up harness that can add to any steampunk costume.


Materials
-Puck light (about 3inch diameter)
-PVC toilet flange
-Copper spray paint
-Spray clear topcoat
-"Leather" vinyl fabric
-2 slide buckles
Tools
-Scissors
-Hacksaw
-File/sandpaper
-Needle/thread
-Superglue
1. Gather the materials
I experimented with some different materials, but ended up sourcing my materials items from home improvement and craft stores. Puck lights are super common, I bought mine cheap from a thrift store but are easy to find in home improvement. The toilet flange would be in the plumbing section for 3-4inch diameter PVC parts, and you could easily use different flange variants depending on the size of the puck light. To be reasonably sure the puck light will fit well in the flange, take the puck with you to the store. It should fit snugly, so you can later remove it from the harness to change the batteries. Copper spray paint and spray clear topcoat can be found both places, but is cheaper at the home improvement store. Some interesting fake leather vinyls, slide buckles, needle, and thread can all be found at a fabric-leaning craft store.
2. Paint the puck light
It doesn't exactly have to be the first thing done, but it's a good a place to start as any. First, clean the puck light and cover the push button part (aka where it lights up). Spray with copper metallic paint to form an even coating. Allow to dry. Use a second coat if needed. Spray with a clear topcoat and let dry again.

3. Cut the flange
At first I overthought this. I was trying to figure out how to do this cleanly with a Dremel, and then I realized it made way more sense to just add a basic hacksaw to my tool collection and go from there. You can buy a decent one with 3 different blades for less than $20. For the type of toilet flange I used, the top extended too far out for my taste. I marked the sides the minimum height I wanted it to stick out (essentially a little more than the height of the puck light), then cut with the hacksaw. I used a file and some sandpaper to even out the rough edges around the cut marks.

4. Paint the flange
After that, I prepped for painting, making sure I washed away any remaining PVC fragments and then thoroughly dried it. I essentially repeated what I did for the puck light, though my addition of the topcoat went a little weird. Might have been the changes in temperature, which led to some wrinkling. I rolled with it, sanded down the wrinkles and touched up the paint job.
 5. Make the straps
You could of course use belts, or webbing, or ribbon, or whatever. I had some bronze type "leather" vinyl on hand, so I cut a few 2.5inch strips and went from there. The length of course is going to depend on who the harness is for and where exactly you want it to be on the chest. So I cut longer strips than I needed, with the idea that I can also cut down.

Next I folded the strip in half and sewed it shut with a running stitch. Easy enough to do by hand, even quicker on a machine unless the vinyl is too thick for a standard needle. My needlework is not very precise, but it did the job.


6. Attach the straps
All right, first put it on and figure out the strap lengths, using clips or similar to keep it in place.

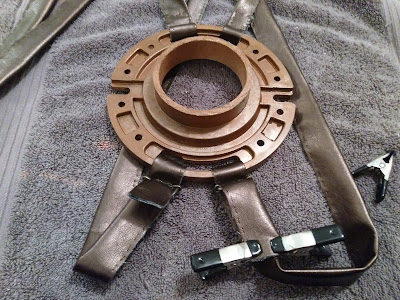
I decided to loop straps at the top of the flange and stitch those shut. These parts of the strap are going to be bearing the most weight, so I decided against putting snaps or slide buckles there. You could use rivets here instead of stitches to make it more interesting. Again, not the finest needlework but it will past muster. These straps with go up over the shoulders, and then cross behind the back, and then reattach at the bottom slot of the flange.

The strap ends that attach at the bottom I decided to keep adjustable by using slide buckles. You can barely see them in the photo below, but they're there. Loop it tight around the flange. At this point you can then trim away the excess strap. Be careful though, since cutting the strap will likely loosen the stitch. To prevent the stitches from coming out, glue the affected area shut. Also try to leave more strap than you think you'll need: putting the harness over more layers of clothes will likely mean needing more strap. Again, easier to cut away than to add more material to a strap.
7. Install puck light
This part was super simple for me. The puck light I have fits snugly in the center part of the flange. I may have issues with it falling out with a lot of motion, but you can make some modifications to make it permanently attached but battery accessible. This particular puck light has three settings, white light, changing color light, and then a third push locks the color. Pretty useful for adapting to certain costumes.

And that's it! Good luck and keep crafting!


Materials
-Puck light (about 3inch diameter)
-PVC toilet flange
-Copper spray paint
-Spray clear topcoat
-"Leather" vinyl fabric
-2 slide buckles
Tools
-Scissors
-Hacksaw
-File/sandpaper
-Needle/thread
-Superglue
1. Gather the materials
I experimented with some different materials, but ended up sourcing my materials items from home improvement and craft stores. Puck lights are super common, I bought mine cheap from a thrift store but are easy to find in home improvement. The toilet flange would be in the plumbing section for 3-4inch diameter PVC parts, and you could easily use different flange variants depending on the size of the puck light. To be reasonably sure the puck light will fit well in the flange, take the puck with you to the store. It should fit snugly, so you can later remove it from the harness to change the batteries. Copper spray paint and spray clear topcoat can be found both places, but is cheaper at the home improvement store. Some interesting fake leather vinyls, slide buckles, needle, and thread can all be found at a fabric-leaning craft store.
2. Paint the puck light
It doesn't exactly have to be the first thing done, but it's a good a place to start as any. First, clean the puck light and cover the push button part (aka where it lights up). Spray with copper metallic paint to form an even coating. Allow to dry. Use a second coat if needed. Spray with a clear topcoat and let dry again.

3. Cut the flange
At first I overthought this. I was trying to figure out how to do this cleanly with a Dremel, and then I realized it made way more sense to just add a basic hacksaw to my tool collection and go from there. You can buy a decent one with 3 different blades for less than $20. For the type of toilet flange I used, the top extended too far out for my taste. I marked the sides the minimum height I wanted it to stick out (essentially a little more than the height of the puck light), then cut with the hacksaw. I used a file and some sandpaper to even out the rough edges around the cut marks.

4. Paint the flange
After that, I prepped for painting, making sure I washed away any remaining PVC fragments and then thoroughly dried it. I essentially repeated what I did for the puck light, though my addition of the topcoat went a little weird. Might have been the changes in temperature, which led to some wrinkling. I rolled with it, sanded down the wrinkles and touched up the paint job.

You could of course use belts, or webbing, or ribbon, or whatever. I had some bronze type "leather" vinyl on hand, so I cut a few 2.5inch strips and went from there. The length of course is going to depend on who the harness is for and where exactly you want it to be on the chest. So I cut longer strips than I needed, with the idea that I can also cut down.

Next I folded the strip in half and sewed it shut with a running stitch. Easy enough to do by hand, even quicker on a machine unless the vinyl is too thick for a standard needle. My needlework is not very precise, but it did the job.

I thought about adding a second running stitch near the crease to mimic other straps, but decided not to. You can also reinforce this strap by using glue, but it's not necessary.

6. Attach the straps
All right, first put it on and figure out the strap lengths, using clips or similar to keep it in place.


7. Install puck light
This part was super simple for me. The puck light I have fits snugly in the center part of the flange. I may have issues with it falling out with a lot of motion, but you can make some modifications to make it permanently attached but battery accessible. This particular puck light has three settings, white light, changing color light, and then a third push locks the color. Pretty useful for adapting to certain costumes.

And that's it! Good luck and keep crafting!


Comments
Post a Comment