Making a Poseable Occamy
In the movie Fantastic Beasts and Where to Find Them from the Harry Potter legacy, one of the titular fantastic beasts is an “Occamy,” a beautiful blue-green feathered serpent creature that grows or shrinks to fit its environment. While I can’t make a prop that does that (unless I want to get one of those weird growing sponge dinosaur things), I can (possibly) make a cute, poseable version of said bird snake.
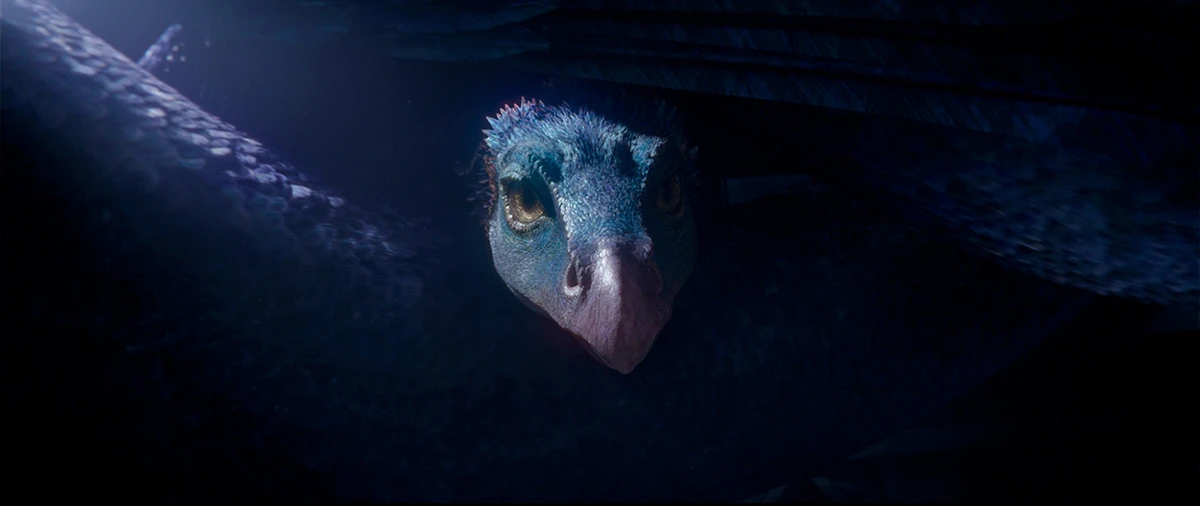
Versus some depictions in the Fantastic Beasts and Where to Find Them film:
As ever, I decided to take some artistic license with the creature (but not too much), and I ended up it out of:
-Foam (a seat cushion from Jo-Ann’s, about an inch thick)
1. Determine the size of your Occamy
I wanted a small one to wrap around my wrist, and I had a cushion that was 18 inches long, so I made an 18 inch Occamy, plus an inch or so for the head.
2. Prepare your sequin fabric
This was, by far, the most time-consuming and boring part for me. For fabric where the sequins are sewn on (which I used because it gives a gorgeous scaly pattern and texture), you need to mark out on your fabric where your seam is going to be. I folded the fabric in half (right-side [sequin-side] out), and made a long, tapered triangle shape so I would end up with a tapered tube.
After looking online, it came to my attention that I would have to clear the sequins from the seam allowance around the edges of that shape (because if you fold sequins under the seam of the fabric, it’s not going to be pretty). So pick all the sequins off about a half-inch border around the shape. You can use different things to pick them off, but I found a seam ripper worked the best for me. Remember to trim away the excess fabric around the outside of the denuded border afterwards.
3. Make a tapered tube of foam to fit inside the sequin fabric
Again, cut a tapered triangle, then trim it with scissors until its rounded on the sides and it seems like it’s going to fit inside the sequin tube. I realize that sounds really vague, but vague works pretty well here. The rounding doesn’t have to be perfect, as long as its not too lumpy, the sequin texture should hide many flaws. Similarly, the size doesn’t have to perfect either, although I’d err a little fat rather than a little skinny, since the foam will be easily cinched in when you sew up the tube.
4. Cut the top third of the foam tube off (the fatter end)
This is the point at which you will insert the wings.
5. Insert a piece of floral wire into the foam tube
This is probably the trickiest part. The foam is squishy and doesn’t really want to be pierced. I decided to start the process by stabbing the flat end with a small knife to create a hole. It’s not easy, but it was easier for me than starting with the wire.
Then I inserted the wire into the hole and just kept pushing until I was about an inch from the tapered end of the tube. Be careful not to push the wire through the sides of the tube.
6. Sew up the tube
This wasn’t exactly tricky, but I had to do it in kind of a weird way. For these particular materials, I couldn’t sew the tube normally (sewing it inside out and then turning it inside out so the seam was on the inside) and insert the foam because the foam would not stop sticking to the mesh interior of the sequin fabric. So instead, I had to sew the tube around the foam, tucking the seam allowance inside the seam along the way.
Once you reach the end of this piece of foam, you can:
7. Attach the wings
To do this, take another piece of floral wire, wrap it around your exposed body wire, and poke the ends through the sequin fabric. From there you can bend them into whatever wing-like shapes you want. At that point you can take your leftover piece of foam piece and squish it onto the body wire so it sandwiches the wing joint between the two pieces of foam. I would recommend also gluing the pieces of foam together around the wing joint as well (Shoe Goo works great).
8. Finish the tube
When you’re satisfied with the wing joint and the glue has dried, you can finish sewing the sequin tube around the new foam. At that point, I took the bit of floral wire that emerged from the foam tube and used it to attach the wooden bead, before sewing the last of the fabric over the whole thing. I know the bead seems a little pointless now, but without it, you wouldn’t have anywhere the anchor the head later on.
9. Make a head
This is the most artsy bit of the whole thing, and may require a little practice with polymer clay. I like this clay because it doesn’t crack and it’s fairly durable. On the other hand, it’s not very light-weight, and it does have to be baked to set it. Different polymer clay brands require different baking times and temps, but I found that http://www.earthguild.com/products/riff/rpolymer.htm has a pretty simple guide to working with polymer if you’re new.
In general, you want to make a basic head shape, based on the Occamy in the film, or whatever strikes your fancy. Then hollow out the back of the skull so it will fit over the wooden bead on the body. This fit doesn’t have to be perfect, but if the hollow is too small after you bake, you’re going to have major problems. I figured out the rough size and shape I wanted, and then I put a ball of aluminum foil about the same size of the bead into the hollow so that I wouldn’t accidentally squish the hollow later on.
After making the basic shape, build up the details. I treated the head kind of like a forensic exercise, carving out the eye sockets and snout to make more of a skull-shape, and then adding the eyes and building up the eyelids and brow ridges around the eyes and a beak shape on the end of the nose.
These are the eyes I used, bought from Michaels in their vaguely steampunk bead area. They came in a weird assortment that had one of every type of eye, so I ended up buying two packages in order to actually have matching eyes. There are plenty of other ways to make the eyes, but these are amazing and they really add an air of liveliness and intelligence to the end product.
Once you have the head the way you like, it’s time to decorate. I dug through my capacious bead box for some shiny bits and bobs, and tried to make something of a scale pattern on the forehead and cheeks (it…sort of worked). I also poked some holes around the edges of the face, where I planned to insert feathers after the head was attached. After that, it’s just a matter of baking. I used Primo clay, and I baked at 275° for about an hour.
Tip: Never bake on a metal or a glass surface. Put your piece on wood or cardboard (depending on the temperature), or use a ceramic pie plate or some such thing.
10. Attach the head
And we’re back to Shoe Goo. Use a generous amount to really secure the head to the wooden bead at the angle you want.
11. Decorate the head and wings
This is where I brought out the feathers. They make a fun accent, plus for me they served to cover up the join between the head and the body.
For the wings, I took a square of silvery fabric I had lying around, folded it in half, and sewed a seam about a ¼ inch from the fold.
Then I slid the fabric over the wing wire and cut the excess into the shape I wanted. Rinse and repeat to make a second wing.
For decoration, I wasn’t sure what to do, so more feathers it was.
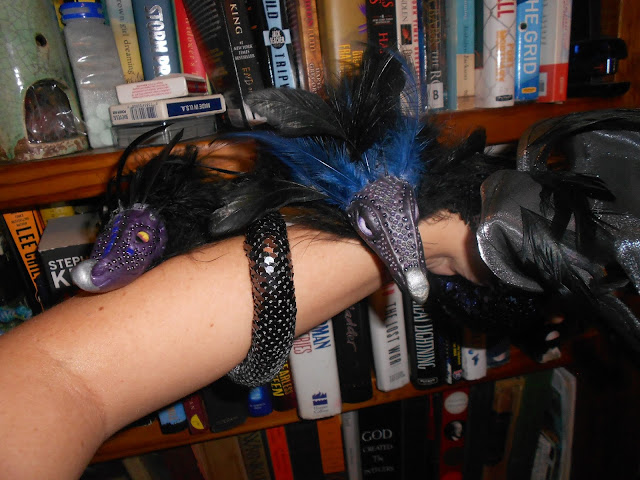
And with that, you’ve got an Occamy. Of a sort. Pose and wrap as you like! It’s not solid as a rock, but I didn’t feel like it was going to break at the first bump either. I ended up wearing Esther here (my trial Occamy) to dinner, the Fantastic Beasts movie, and to drinks afterward with no worries beyond a quick readjustment or two.
This has certainly been done before, with many different materials, and with varying degrees of similarity to the original depiction. Here's my interpretation:
Versus some depictions in the Fantastic Beasts and Where to Find Them film:
As ever, I decided to take some artistic license with the creature (but not too much), and I ended up it out of:
-Foam (a seat cushion from Jo-Ann’s, about an inch thick)
-Floral Wire (also from Jo-Ann’s, mine was fabric-wrapped, but it doesn’t have to be)
-Wooden Bead (a round one with a hole through the middle, about an inch in diameter as well)
-Sequin Fabric (how much depends on how big you want to make the creature, I found that 6 inches was more than enough for me, and it makes those types of fabric much more affordable)
-Fabric for the wings (again, only a small amount is necessary)
-Polymer Clay (I used this to fashion the head of the Occamy)
-Assorted Gewgaws (for decoration. I ended up using a variety of seed beads, some feathers from Hobby Lobby, and some glass eyes from Michael’s. I’ll show them later, because they are the best)
-Basic Tools (I used scissors [not ones that you’re attached to, because cutting sequins and foam is murder on scissor blades], a mid-size needle and some thread, glue that works on foam [I used Shoe Goo and it worked surprisingly well], and a small knife)
1. Determine the size of your Occamy
I wanted a small one to wrap around my wrist, and I had a cushion that was 18 inches long, so I made an 18 inch Occamy, plus an inch or so for the head.
2. Prepare your sequin fabric
This was, by far, the most time-consuming and boring part for me. For fabric where the sequins are sewn on (which I used because it gives a gorgeous scaly pattern and texture), you need to mark out on your fabric where your seam is going to be. I folded the fabric in half (right-side [sequin-side] out), and made a long, tapered triangle shape so I would end up with a tapered tube.
After looking online, it came to my attention that I would have to clear the sequins from the seam allowance around the edges of that shape (because if you fold sequins under the seam of the fabric, it’s not going to be pretty). So pick all the sequins off about a half-inch border around the shape. You can use different things to pick them off, but I found a seam ripper worked the best for me. Remember to trim away the excess fabric around the outside of the denuded border afterwards.
3. Make a tapered tube of foam to fit inside the sequin fabric
Again, cut a tapered triangle, then trim it with scissors until its rounded on the sides and it seems like it’s going to fit inside the sequin tube. I realize that sounds really vague, but vague works pretty well here. The rounding doesn’t have to be perfect, as long as its not too lumpy, the sequin texture should hide many flaws. Similarly, the size doesn’t have to perfect either, although I’d err a little fat rather than a little skinny, since the foam will be easily cinched in when you sew up the tube.
This is the point at which you will insert the wings.
5. Insert a piece of floral wire into the foam tube
This is probably the trickiest part. The foam is squishy and doesn’t really want to be pierced. I decided to start the process by stabbing the flat end with a small knife to create a hole. It’s not easy, but it was easier for me than starting with the wire.
Then I inserted the wire into the hole and just kept pushing until I was about an inch from the tapered end of the tube. Be careful not to push the wire through the sides of the tube.
6. Sew up the tube
This wasn’t exactly tricky, but I had to do it in kind of a weird way. For these particular materials, I couldn’t sew the tube normally (sewing it inside out and then turning it inside out so the seam was on the inside) and insert the foam because the foam would not stop sticking to the mesh interior of the sequin fabric. So instead, I had to sew the tube around the foam, tucking the seam allowance inside the seam along the way.
Once you reach the end of this piece of foam, you can:
7. Attach the wings
To do this, take another piece of floral wire, wrap it around your exposed body wire, and poke the ends through the sequin fabric. From there you can bend them into whatever wing-like shapes you want. At that point you can take your leftover piece of foam piece and squish it onto the body wire so it sandwiches the wing joint between the two pieces of foam. I would recommend also gluing the pieces of foam together around the wing joint as well (Shoe Goo works great).
8. Finish the tube
When you’re satisfied with the wing joint and the glue has dried, you can finish sewing the sequin tube around the new foam. At that point, I took the bit of floral wire that emerged from the foam tube and used it to attach the wooden bead, before sewing the last of the fabric over the whole thing. I know the bead seems a little pointless now, but without it, you wouldn’t have anywhere the anchor the head later on.
9. Make a head
This is the most artsy bit of the whole thing, and may require a little practice with polymer clay. I like this clay because it doesn’t crack and it’s fairly durable. On the other hand, it’s not very light-weight, and it does have to be baked to set it. Different polymer clay brands require different baking times and temps, but I found that http://www.earthguild.com/products/riff/rpolymer.htm has a pretty simple guide to working with polymer if you’re new.
These are the eyes I used, bought from Michaels in their vaguely steampunk bead area. They came in a weird assortment that had one of every type of eye, so I ended up buying two packages in order to actually have matching eyes. There are plenty of other ways to make the eyes, but these are amazing and they really add an air of liveliness and intelligence to the end product.
Tip: Never bake on a metal or a glass surface. Put your piece on wood or cardboard (depending on the temperature), or use a ceramic pie plate or some such thing.
10. Attach the head
And we’re back to Shoe Goo. Use a generous amount to really secure the head to the wooden bead at the angle you want.
11. Decorate the head and wings
This is where I brought out the feathers. They make a fun accent, plus for me they served to cover up the join between the head and the body.
For the wings, I took a square of silvery fabric I had lying around, folded it in half, and sewed a seam about a ¼ inch from the fold.
Then I slid the fabric over the wing wire and cut the excess into the shape I wanted. Rinse and repeat to make a second wing.
For decoration, I wasn’t sure what to do, so more feathers it was.


Comments
Post a Comment