How to make a Harry Potter wand
There are a lot of ways to approach wand-making. Of course the easiest wand to make is the branch in the backyard. Another way is to modify a dowel or chopstick. But since I've always admired the ornate, turned handles of some wands in the films. However, I don't have the access or skill to use a wood lathe. So instead I set out to make my own simplified version with materials found in craft, thrift, and hardware stores. The raw materials for the wand itself cost only $1.60, and not much more when you add in stain and superglue.
Materials


 |
| Wands from the Harry Potter films (graphic by Albus_Silente) |
Materials

-Wooden dowel
-Wooden candlestick
-Large wooden beads, finials
-Danish oil (for light stain/finish) or wood stain
-Superglue
-Sandpaper
-Danish oil (for light stain/finish) or wood stain
-Superglue
-Sandpaper
Tools
-Hacksaw
-Pocketknife
1. Gather the materials
For this version of a wand I visited craft, hardware, and thrift stores to gather the materials. For the main segment of wand, I bought a 5/16 inch diameter wooden dowel from a craft store for about 60 cents. I've seen other tutorials base theirs on a chopstick, which is a good option if you don't have access to a basic saw, but personally I like starting out with more length than I need. I'd already had Danish oil (a combination wood stain and finishing oil) and superglue from the hardware store, leftover from previous projects. I didn't want a stain to be very dark, but there are a selection of stains and varnishes you can get at hardware or craft stores to achieve the gamut of wood colors. And finally I searched thrift stores for turned wood pieces that I could use as wand handles. As you can see below, you can use a spoke salvaged from a magazine rack, wooden beads and a small candlestick, and an icepick with cover. I've also seen decorative spoons, chair spokes, etc. You can also source handles from wood finials from hardware or craft stores, or stacking wooden beads.
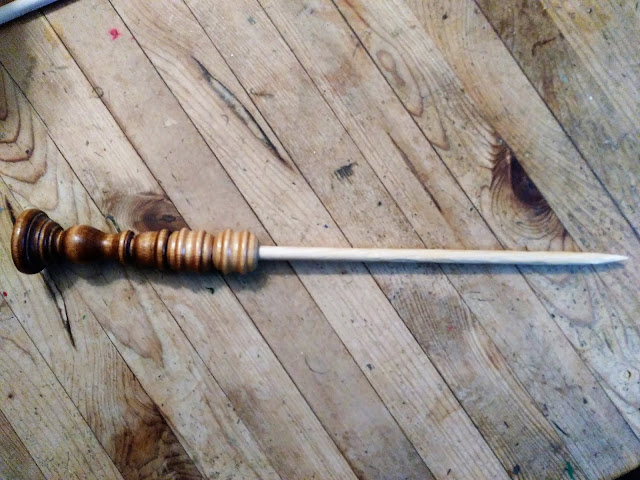
 For this wand I used the middle parts, the two wooden beads and a small wooden candlestick, in total cost about $1.

2. Cut dowel
After choosing a desired handle, you need to decide how long the wand is going to be. According to Pottermore, on average wands are between 9 and 14 inches. This includes the length of the handle. So when cutting a length of dowel, be sure to consider the handle length.

Originally I thought to make a 14 inch wand to match my Pottermore quiz. After some thought though I reduced that to 13 inches, because I thought any longer and it gets a little cumbersome. I borrowed a hacksaw to carefully cut a length of about 11 inches, since it actually sits down in the cup of the candlestick. If you are not an adult, please get help from one in using the hacksaw.
3. Carve the end
So of course the dowel end needs to be tapered to make it look like a wand. I used a pocketknife to carefully shave down the end, turning the dowel regularly to make sure it was carved down evenly. I don't recommend getting it too sharp though, since odds are you're going to end up accidentally sitting on it or nearly poking your friend's eyeballs (note: this is not an endorsement to poke yourself or your friends with sticks). Again, if you're not an adult please get an adult to help with this.

I decided to also rough up some of the sides to make it look less like a dowel, carving off slivers to make it more faceted. After that I lightly sanded the sides.

4. Stain the dowel
I decided to also rough up some of the sides to make it look less like a dowel, carving off slivers to make it more faceted. After that I lightly sanded the sides.

While the handles found in thrift stores are already stained, the dowel is conspicuously unstained. This might be the look you want, but I wanted it to be closer to the light brown stain of the handle pieces I picked. I used Danish oil, which you can buy in various shades. It is a combination stain and varnish, meaning it changes the color of the wood and adds a protective coat. To apply, pour a little onto a paper towel and wipe onto the dowel and allow to dry. You can add more layers to deepen the color somewhat, but if you want a darker color you should start with a darker stain. In retrospect, I would have used a darker shade of Danish oil, but for this particular piece I was on the clock.
5. Glue the pieces
I used drops of superglue to start assembling the pieces of the handle. I glued the first bead to the candlestick, and then the second bead on top.

Then I applied drops of glue to the unsharpened end of the dowel and the sides of the dowel that would be inside the handle. Fix into place.

6. Embellish (if desired)
For my costume, I decided that my embellishment would be handle. But in the Harry Potter films there are lots of wands with additional design elements like metalwork, carving, a pommel stone, or other turned pieces. I think you could also add wood-burned designs or paint if you wish. If you're making this wand for a particular character, keep these embellishments in mind because they can definitely help with character development. If you're making it for yourself, certainly make it your own! Here's the wand I made for my Ravenclaw Auror-type character:

And here's a wand made in the same method for a Slytherin heiress character. The handle may be stained darker, but this worked in a pinch. The curved shaft of the wand is made from a decorative spoon, and the handle is a series of stacked wooden beads and a finial for a vertebrae effect.

Anyway, good luck and keep crafting! Here are some other great tutorials for wand-making:
- Wikihow's 3 Ways to Make a Harry Potter Wand: https://www.wikihow.com/Make-a-Harry-Potter-Wand
- Epbot's DIY Light-Up Wand: https://www.epbot.com/2014/07/diy-light-up-wand-tutorial-for-harry.html
- Vintage Kitty's DIY Harry Potter Wands: https://vintagekitty.com/diy-harry-potter-wands/
- Makezine's Turning a Realistic Harry Potter Wand on a Wood Lathe: https://makezine.com/2017/09/13/turning-realistic-harry-potter-wand-wood-lathe/
And if you haven't already acquainted yourself with Pottermore, you really should. If you love all things Harry Potter, this website backed by J.K. Rowling let's you get sorted into Houses, has a wand choose you, reveals your Patronus, and keeps adding new content about the wizarding world.


Comments
Post a Comment