How to make a Jedi's utility belt
Whether bringing peace and understanding to the citizens of the galaxy or fighting the menace of the Sith, a Jedi needs to be prepared. And while a calm mind and a trust in the Force are the best tools a Jedi has, it never hurts to carry a few more material assets. Thus an indispensable part of a Jedi's gear is his or her utility belt. In times of the Old Republic the belt was a little more standardized, perfectly in keeping with the traditional tunics, tabards, and obi reminiscent of Earth's samurai. To make this work you can use tutorials making them from foam, fake leather, or up the ante and make it from real leather. This tutorial tries for a middle road using thrift store leather belts and buckles with simple crafting using screw posts and superglue.

Compare that to my cheap but less-than-authentic Mark I belt I made from fake leather vinyl folded over on itself. Serviceable (it looks somewhat better when worn) but not ideal. Still, the things I learned in that first build, such as using a purse strap, sources of interesting decorative buckles, and placement of screw posts, all helped with making the Mark II.

So here's what I needed to complete this project:
Materials
-Leather waist belt
-Matching leather purse strap
-Small unusual buckle
-Screw posts
-Small tongue buckle
Tools
-Scissors
-Needle/thread
-Leather hole punch (I used a Crop-o-dile)
-Super glue
-Pliers
Reference Image
 1. Gather the materials
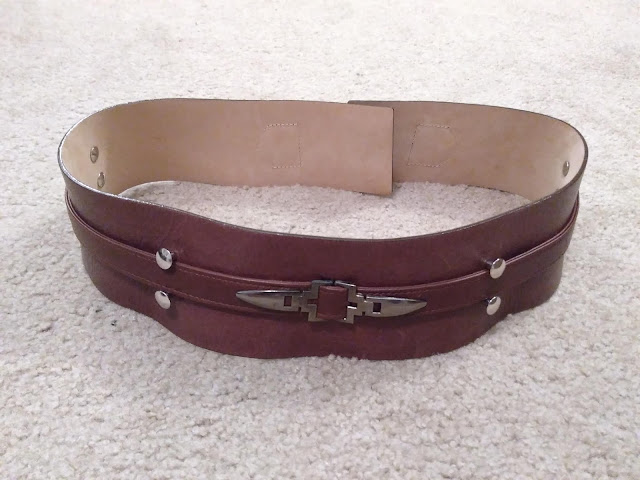
I found these items by trawling through thrift stores and craft stores. It took a while to find just the right belt, but women's fashions have a penchant for waist belts. Eventually I found a nice brown leather waist belt, well-made, simplistic, with an adjustable closure (for $6).
I then looked for a 1-inch wide strap that would serve as the smaller belt. In my experience the belts that are made this width are generally some form of plastic. It can imitate leather, but the color generally flakes and the material is difficult to work with. I advise looking for purse straps that would match the color of the belt. Purses or fashionable backpacks are pretty common in thrift stores, and it's more common to find decent quality leather in the straps that won't flake or crumble. I found this Da Vinci purse with the perfect color and width straps. Bonus, I can use the leather and bits for future projects. This was about $8.

It's tough to find a decorative buckle that exactly replicates the Jedi utility belts. But lots of decorative pieces on purses and shoes can emulate Jedi. Simple buckles that aren't tongue buckles (most traditional belts) or side-release buckles (most backpack buckles) are usually the way to go. On my mark 1 Jedi belt I used a small snap buckle with overlapping ovals I bought from Etsy. For this project I salvaged some neat decorative metal pieces from a pair of crappy shoes I found in a thrift store. The shoes cost about $2.
To secure the small belt in the back I used a tongue buckle I salvaged from another purse, and the metal even matches the look of the decorative buckle and the large belt's fasteners.
The rest can be found in a craft store. The screw posts are found in the leatherworking section, super glue pretty much any hardware or big box store.
2. Making the small belt
A lot of my projects start with me mutilating a perfectly fine thing I found in some thrift store. A brown leather tote with a Da Vinci painting? Cool but not really my style. I cut off the straps, and plan on using the leather of the bag in future craft projects.

Some straps are long enough on their own, but since I was so focused on getting the right width and color I went for straps that on their own will not make it around the waist belt. So I added some stitches at the ends of the straps, attaching one to the other. It's not terribly strong, but the small belt doesn't need to take much weight. To get the needle to pierce the leather I needed a decent-sized needle and to pull it through using a pair of pliers.

3. Attaching the buckle
I removed the strap decorations from that cheap pair of shoes and threaded them onto the small belt. I positioned it just to the side of where the two straps are sewn together.

For this particular "buckle" I need to cut slits in the belt with a hobby knife. The metal poseable prongs of the decorations were pushed through the slits and bent around the belt to hold them in place.

4. Mounting the small belt to the large belt
Find the center of the waist belt, lengthwise and widthwise. On the strap's reverse, and only in the section where the buckle is, use superglue to fix it in place. You don't want to use glue the entire length of the strap because you need to be able to affix the food capsules, lightsaber belt clip, and pouches.

5. Attach the screw posts
In the previous picture you can see that I started marking the locations for some of the screw posts. The screw posts are the silver buttons you see above and below the smaller belt. Besides decoration, their purpose is to loosely keep the small belt in place and to keep it from sagging. To be as accurate as possible go with button studs, but screw posts and Chicago screws also work well. I favor screw posts, since they're easy to find in most craft stores (which generally don't have an expansive leatherworking section), and they're easy to work with.
The spacing is flexible, but to be accurate you should use four pairs of screw posts along the belt. Two pairs should be visible from a front view, about 3 to 6 inches away from the small belt's buckle on either side. I placed the other pairs 90 on either side of the waist, so if you had profile shot of the costume you would see it dead on. It made sense to me to put them there because it's a space on the belt you don't want the lightsaber or pouches to be. Otherwise as you're walking your arms would be striking the pouch or lightsaber. With the screw posts right there it doesn't matter as much. The key thing with placement is to make sure you're thinking of where everything else on the belt will be situated.
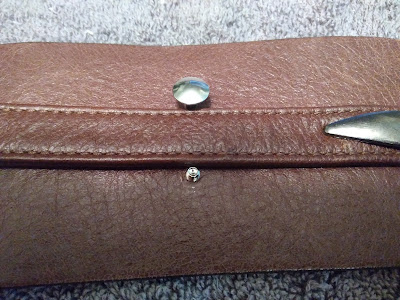
Once you mark placement, use a leather hole punch to punch 1/8inch holes. Be sure to get at close to the small belt as possible, you'll want the wide part of the screw post to overlap the small belt. Screw posts are easy to install after the hole punch, just push the "male" end up from the bottom and screw the "female" end on the top. To ensure the screw posts don't unscrew themselves, smear a little Loctite threadlocker to the threading before installation.

When you've installed all the screw posts, add a little superglue to the underside of the small belt at the screw post locations. Though the purpose of the button studs, screw posts, and Chicago screws are supposed to keep the small belt fixed in place, in my experience it doesn't work too well. Be sure to keep the rest of the belt free from superglue so you can attach the food capsules and pouches later.
6. Attach buckle to ends
I cut down the straps some so that they could be easily cinched and secured. To secure the two ends of the small belt around back I used a tongue buckle I salvaged from another purse. With a hobby knife I was able to make a hole for the "tongue" to pass through the strap.

And then I folded the end of the strap back on itself, and glued it into place.

I put the belt on to figure out how much of the other end of the strap needs to be cinched to fit well. Then I slit a hole in that end of the strap so the tongue could pass through it and hold that length.

7. Finishing touches
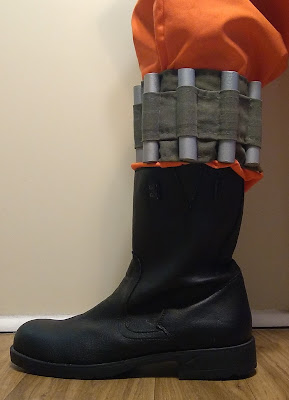
Other than that, all you need to do to complete the look is to add the pouches, food capsules, and lightsaber clip. At a glance there's some basic tutorials out there for making the capsules (this one by Saso Is-kor) and pouches (this one by OffWorld Girl). The lightsaber clip can be either a D-ring clip or Covertec clip. With those details you're off and ready to fight the Dark Side! Here are some extra shots of the belt for reference. Good luck and keep crafting!


Compare that to my cheap but less-than-authentic Mark I belt I made from fake leather vinyl folded over on itself. Serviceable (it looks somewhat better when worn) but not ideal. Still, the things I learned in that first build, such as using a purse strap, sources of interesting decorative buckles, and placement of screw posts, all helped with making the Mark II.

So here's what I needed to complete this project:
Materials
-Leather waist belt
-Matching leather purse strap
-Small unusual buckle
-Screw posts
-Small tongue buckle
Tools
-Scissors
-Needle/thread
-Leather hole punch (I used a Crop-o-dile)
-Super glue
-Pliers
Reference Image

I found these items by trawling through thrift stores and craft stores. It took a while to find just the right belt, but women's fashions have a penchant for waist belts. Eventually I found a nice brown leather waist belt, well-made, simplistic, with an adjustable closure (for $6).
I then looked for a 1-inch wide strap that would serve as the smaller belt. In my experience the belts that are made this width are generally some form of plastic. It can imitate leather, but the color generally flakes and the material is difficult to work with. I advise looking for purse straps that would match the color of the belt. Purses or fashionable backpacks are pretty common in thrift stores, and it's more common to find decent quality leather in the straps that won't flake or crumble. I found this Da Vinci purse with the perfect color and width straps. Bonus, I can use the leather and bits for future projects. This was about $8.

It's tough to find a decorative buckle that exactly replicates the Jedi utility belts. But lots of decorative pieces on purses and shoes can emulate Jedi. Simple buckles that aren't tongue buckles (most traditional belts) or side-release buckles (most backpack buckles) are usually the way to go. On my mark 1 Jedi belt I used a small snap buckle with overlapping ovals I bought from Etsy. For this project I salvaged some neat decorative metal pieces from a pair of crappy shoes I found in a thrift store. The shoes cost about $2.
To secure the small belt in the back I used a tongue buckle I salvaged from another purse, and the metal even matches the look of the decorative buckle and the large belt's fasteners.
The rest can be found in a craft store. The screw posts are found in the leatherworking section, super glue pretty much any hardware or big box store.
2. Making the small belt
A lot of my projects start with me mutilating a perfectly fine thing I found in some thrift store. A brown leather tote with a Da Vinci painting? Cool but not really my style. I cut off the straps, and plan on using the leather of the bag in future craft projects.

Some straps are long enough on their own, but since I was so focused on getting the right width and color I went for straps that on their own will not make it around the waist belt. So I added some stitches at the ends of the straps, attaching one to the other. It's not terribly strong, but the small belt doesn't need to take much weight. To get the needle to pierce the leather I needed a decent-sized needle and to pull it through using a pair of pliers.

3. Attaching the buckle
I removed the strap decorations from that cheap pair of shoes and threaded them onto the small belt. I positioned it just to the side of where the two straps are sewn together.

For this particular "buckle" I need to cut slits in the belt with a hobby knife. The metal poseable prongs of the decorations were pushed through the slits and bent around the belt to hold them in place.

4. Mounting the small belt to the large belt
Find the center of the waist belt, lengthwise and widthwise. On the strap's reverse, and only in the section where the buckle is, use superglue to fix it in place. You don't want to use glue the entire length of the strap because you need to be able to affix the food capsules, lightsaber belt clip, and pouches.

5. Attach the screw posts
In the previous picture you can see that I started marking the locations for some of the screw posts. The screw posts are the silver buttons you see above and below the smaller belt. Besides decoration, their purpose is to loosely keep the small belt in place and to keep it from sagging. To be as accurate as possible go with button studs, but screw posts and Chicago screws also work well. I favor screw posts, since they're easy to find in most craft stores (which generally don't have an expansive leatherworking section), and they're easy to work with.
The spacing is flexible, but to be accurate you should use four pairs of screw posts along the belt. Two pairs should be visible from a front view, about 3 to 6 inches away from the small belt's buckle on either side. I placed the other pairs 90 on either side of the waist, so if you had profile shot of the costume you would see it dead on. It made sense to me to put them there because it's a space on the belt you don't want the lightsaber or pouches to be. Otherwise as you're walking your arms would be striking the pouch or lightsaber. With the screw posts right there it doesn't matter as much. The key thing with placement is to make sure you're thinking of where everything else on the belt will be situated.

Once you mark placement, use a leather hole punch to punch 1/8inch holes. Be sure to get at close to the small belt as possible, you'll want the wide part of the screw post to overlap the small belt. Screw posts are easy to install after the hole punch, just push the "male" end up from the bottom and screw the "female" end on the top. To ensure the screw posts don't unscrew themselves, smear a little Loctite threadlocker to the threading before installation.

When you've installed all the screw posts, add a little superglue to the underside of the small belt at the screw post locations. Though the purpose of the button studs, screw posts, and Chicago screws are supposed to keep the small belt fixed in place, in my experience it doesn't work too well. Be sure to keep the rest of the belt free from superglue so you can attach the food capsules and pouches later.
6. Attach buckle to ends
I cut down the straps some so that they could be easily cinched and secured. To secure the two ends of the small belt around back I used a tongue buckle I salvaged from another purse. With a hobby knife I was able to make a hole for the "tongue" to pass through the strap.

And then I folded the end of the strap back on itself, and glued it into place.

I put the belt on to figure out how much of the other end of the strap needs to be cinched to fit well. Then I slit a hole in that end of the strap so the tongue could pass through it and hold that length.

7. Finishing touches
Other than that, all you need to do to complete the look is to add the pouches, food capsules, and lightsaber clip. At a glance there's some basic tutorials out there for making the capsules (this one by Saso Is-kor) and pouches (this one by OffWorld Girl). The lightsaber clip can be either a D-ring clip or Covertec clip. With those details you're off and ready to fight the Dark Side! Here are some extra shots of the belt for reference. Good luck and keep crafting!


Comments
Post a Comment