How to make a Stargate Atlantis personal shield device
For the Stargate expedition to the Pegasus galaxy, every little bit of Ancient technology helps. Well, once Dr. McKay gets a handle on his anxiety and learns how to use it properly. Here's how to make one the Ancient personal shield devices using budget materials and a little creativity.

This version is slightly larger scale then the one in the series out of convenience. For the LED light I wanted to use a small , and since those battery-powered puck lights are usually 3inch in diameter or more I scaled this up slightly so it would fit. Below for some screen references for the device, some from YourProps.com and some from Deviant Art user Euderian who made their own version.
References


Materials
-Green plastic flexible binder
-Floral wire (variety of widths)
-"Selfie" light with clip
-Fabric paint
-Silver metallic marker
Tools
-Scissors
-Hot glue gun
-Dremel with cutting attachment (depending on light design)
1. Gather the materials
For these materials, first I recommend a trip to the dollar store or similar. That's where I was able to get the green flexible binder, which is useful because its translucent and pretty close to the green in the activated reference image. I'm starting to see "selfie lights" pop up in Five Below, which are like small puck lights that can be charged by microUSB cable and clipped to objects.

Then you can pick up fabric puff paint, floral wire, and a silver metallic marker from most craft stores.
2. Making the pattern
Like I said, this design is a little larger in scale with the max dimensions being 3x4 inches.

3. Making the frame
Using sturdier floral stem wire, trace the outline of the pattern. I know this photo shows it a little outsized, but it's showing a previous version, stick to the 3x4 pattern. Do the same for the small coffin shape in the middle.

Then using thinner floral wire start connecting the inner and outer shapes. Try to keep the inner shape level, and tall enough so that the light will fit within the domed shape.

Like so...

In my second draft of this I added another thick floral stem across the back of the device like so. That way you have something for the light to clip to and a way to clip the device to a shirt. This method works very well for a V-neck, but could certainly be modified with different clip/pin attachments.

Definitely add the back wire now though, before the The frame should kind of look like this at this stage.

4. Add the sides
First cut the sides. Press the facets to the plastic binder and trace around the wires, and then cut down to fit.

Then hot glue the facets onto the frame. Try not to get excess hot glue all over the place, as this will show up as odd shadows when light is shining through the plastic later.

As you go along you may need to trim down the edges so that they fit together well. I can't say this was well thought out, but seemed to work fairly well. Many of the inconsistences will be covered up by the "soldering" step.

5. Add the "soldering"
On the device there appears to be soldering on the facet edges, which gives the geometric shape of the device some interesting organic curves. Use a basic fabric puff paint to carefully apply the pattern along the facet edges. Kee

Once dry, use a silver metallic marker to "paint" the fabric paint.

6. Preparing the light
Finding just the right lighting element was a bit of a challenge. Puck lights are my go-to, but they're a bit too big for this project. Wandering through a Five Below store, I saw this "selfie" light that you can clip to the top of your phone. Besides its size, it has the advantage of no bulky batteries, diffuse soft white light, three light intensity settings, and removable clip.

I cut off an obstruction the back of the light, and then glued it to the clip, making sure the charging port and on/off button remained accessible.

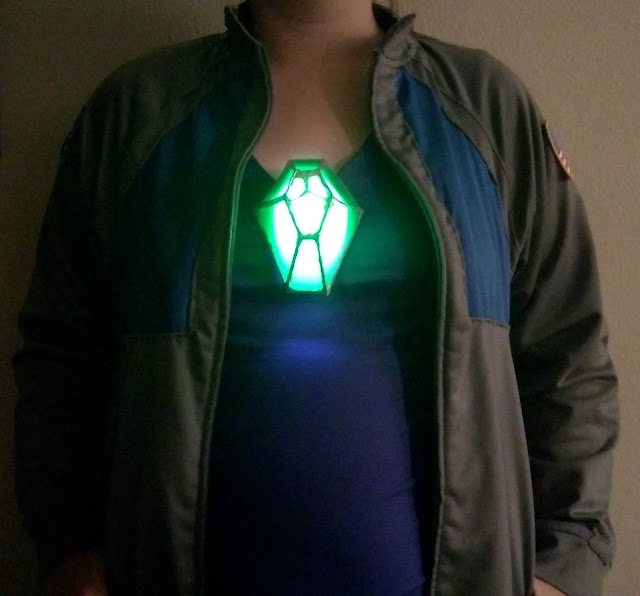
Once dried, you can clip it over the floral wire in the back and to the shirt. If you're not clipping it to a V-neck, I'd recommend gluing a broach pin to the back of the clip/light instead. Once you've worked out how to attach it to a shirt, it's finished! Good luck and keep crafting!


This version is slightly larger scale then the one in the series out of convenience. For the LED light I wanted to use a small , and since those battery-powered puck lights are usually 3inch in diameter or more I scaled this up slightly so it would fit. Below for some screen references for the device, some from YourProps.com and some from Deviant Art user Euderian who made their own version.
References


Materials
-Green plastic flexible binder
-Floral wire (variety of widths)
-"Selfie" light with clip
-Fabric paint
-Silver metallic marker
Tools
-Scissors
-Hot glue gun
-Dremel with cutting attachment (depending on light design)
1. Gather the materials
For these materials, first I recommend a trip to the dollar store or similar. That's where I was able to get the green flexible binder, which is useful because its translucent and pretty close to the green in the activated reference image. I'm starting to see "selfie lights" pop up in Five Below, which are like small puck lights that can be charged by microUSB cable and clipped to objects.

Then you can pick up fabric puff paint, floral wire, and a silver metallic marker from most craft stores.
2. Making the pattern
Like I said, this design is a little larger in scale with the max dimensions being 3x4 inches.

3. Making the frame
Using sturdier floral stem wire, trace the outline of the pattern. I know this photo shows it a little outsized, but it's showing a previous version, stick to the 3x4 pattern. Do the same for the small coffin shape in the middle.

Then using thinner floral wire start connecting the inner and outer shapes. Try to keep the inner shape level, and tall enough so that the light will fit within the domed shape.

Like so...

In my second draft of this I added another thick floral stem across the back of the device like so. That way you have something for the light to clip to and a way to clip the device to a shirt. This method works very well for a V-neck, but could certainly be modified with different clip/pin attachments.

Definitely add the back wire now though, before the The frame should kind of look like this at this stage.

4. Add the sides
First cut the sides. Press the facets to the plastic binder and trace around the wires, and then cut down to fit.

Then hot glue the facets onto the frame. Try not to get excess hot glue all over the place, as this will show up as odd shadows when light is shining through the plastic later.

As you go along you may need to trim down the edges so that they fit together well. I can't say this was well thought out, but seemed to work fairly well. Many of the inconsistences will be covered up by the "soldering" step.

5. Add the "soldering"
On the device there appears to be soldering on the facet edges, which gives the geometric shape of the device some interesting organic curves. Use a basic fabric puff paint to carefully apply the pattern along the facet edges. Kee

Once dry, use a silver metallic marker to "paint" the fabric paint.

6. Preparing the light
Finding just the right lighting element was a bit of a challenge. Puck lights are my go-to, but they're a bit too big for this project. Wandering through a Five Below store, I saw this "selfie" light that you can clip to the top of your phone. Besides its size, it has the advantage of no bulky batteries, diffuse soft white light, three light intensity settings, and removable clip.

I cut off an obstruction the back of the light, and then glued it to the clip, making sure the charging port and on/off button remained accessible.

Once dried, you can clip it over the floral wire in the back and to the shirt. If you're not clipping it to a V-neck, I'd recommend gluing a broach pin to the back of the clip/light instead. Once you've worked out how to attach it to a shirt, it's finished! Good luck and keep crafting!


I am so happy that I have found your blogs on Led Table Mirror . I regularly read your blogs and find them really good. Keep sharing!
ReplyDelete