How to make the Stargate Anubis Guard Ring Remote
If you're a Prime for Ra, a key part of your gear is the ring remote gauntlet. In the original film it's a device that summons rings for instant transportation, with a chainmail glove, claws, and blue jewel activation button. For this version I opted for blue LED as a light-up activation button, which may not be strictly screen-accurate but is shiny and awesome. For more about how you can make your very own budget ring remote, see below.

References


Materials
-EVA foam 8mm
-EVA foam 5mm
-Foam sheet 2mm
-1inch wide black nylon webbing
-Black 1-inch elastic
-Plastidip
-Dark copper spray paint
-Silver metallic spray paint
-Turquoise acrylic paint
-Clear coat sealer
-Blue underwater LED light


References


Materials
-EVA foam 8mm
-EVA foam 5mm
-Foam sheet 2mm
-1inch wide black nylon webbing
-Black 1-inch elastic
-Plastidip
-Dark copper spray paint
-Silver metallic spray paint
-Turquoise acrylic paint
-Clear coat sealer
-Blue underwater LED light
-Old sock (preferable white or gray with little patterning)
-Metallic silver netting fabric
-Metallic silver netting fabric
-Sew-on snap
-Ring blanks
-Dark blue marbles
-Ring blanks
-Dark blue marbles
-Metallic gold marker
Tools
-Boxcutter
-Dremel with sanding drum
-Woodburner
-Heat gun
-Scissors
-Hot glue
-E6000 glue
-Strong black thread/needle
1. Gather the materials
For this project there are a lot of different moving parts. From the craft store you'll need EVA foam of 5mm and 8mm, basic craft foam (2mm, found with children's crafts), metal ring blanks (beading section), metallic gold marker, and blue LED underwater dome light. In the fabric section you can find 1-inch wide black nylon webbing and 1-inch wide elastic (with sewing notions), sew-on snap (also in notions), silver netting (usually in the cosplay or Halloween fabrics). Spray paints, Plastidip, and clear coat sealer are generally cheapest at a hardware store, and odds and ends like blue marbles can be found in a dollar store or craft store. You'll also need a white or gray sock that can be sacrificed to the Goa'uld.
2. Make the gauntlet
To make the gauntlet I used the same pattern for the right arm gauntlet, seen in this tutorial. In retrospect I should have shortened this to allow room for the wrist piece you see in the photos, but I decided to keep it somewhat simple by omitting that piece.

I cut out this piece in the 8mm EVA craft foam, and then sanded the edges with a Dremel. Then I started using a woodburner to etch something close to the pattern seen in the reference images. The key part seems to be a sunburst design towards the back of the gauntlet, seen below.

Then fill in the rest of the design. I didn't try to recreate it line for line, but did try to keep to the general style.

Then add four 2inch lengths of nylon webbing straps, two to either side of the interior of the gauntlet. Use the E6000 glue for best adherence. Then spray paint the interior black so that it isn't so obvious that it's foam.

Next I shaped the gauntlet with a heat gun, allowing to cool around something like a wine bottle. Then I added the elastic straps around the webbing straps.

And then I prepped the gauntlet with Plastidip, allowed to dry, and then put down base coats of dark copper spray paint.

And finally, add the patina. Paint on turquoise acrylic, then wipe off the excess so that only traces remain in the grooves. Once aged to the level you like, allow to dry and then top with clear coat sealer.
3. Make the ring remote
Using the 5mm EVA foam, I cut a shape to approximate the hand piece and then left a hole in the center to mount the LED light. Sand the edges with a Dremel.

Then I used a woodburner to inscribe the design. The important feature is the scarab design in the center where the body of the scarab is the ring remote gem. Here's a picture of the approximate design I used, although this was a previous attempt with a smaller piece.

Shape the piece slightly by heating with heat gun and allowing to cool on a bottle. You want the piece to be slightly curved to fit better on the back of your hand.


Prep the ring remote LED light in a couple of ways. To make the light more diffuse, I added hot glue around the LED on the inside of the light. I also used a "frosted glass" spray paint on the outside of the light's dome. There are probably better ways to make the light more diffuse, but these were easy and on hand methods.
Then I used a half inch width section of nylon webbing to make three straps on the back of the remote. One strap is over the back of the hole of for the LED light, which helps mount the light (since the light has a clip on the back of it. The other two straps will be useful later for attaching the ring remote to the gauntlet and the mail glove.

Then secure the LED light into place by clipping it into the strap and hot-gluing into place. Allow to dry. Then use masking tape to cover the light dome and the edges that allow the dome to twist the light on and off.

Prep the piece with Plastidip, and then spray paint with dark copper. Finally, add patina by using the turquoise paint method and then seal with clear coat. Remove the masking tape when finished.

4. Make the mail glove
Since chain-mail is a pain to put together I opted for this low-key alternative. Less authentic but right on for budget and comfort. All you need is an old sock, silver spray paint, and some silver netting. First cut the toe off a white or gray sock and a hole for the thumb in the heel of the sock. Yes it is very fashionable.

To fix the sag of rest of the heel, I cut the line down from the thumb hole to the cuff of the sock, removed some excess fabric, and then sewed it back to tighten it. I also did some not very good hemming on the cut edges.

Next spray paint the sock with a metallic silver. It doesn't have to be perfect but the closer you can get to obscuring the pattern the better. This might take several coats, but give it plenty of time to dry and top with clear coat sealer.

Then cut out some sections of metallic silver netting for the front and back of the glove.

Start stitching the netting to the edges of the sock, but keep the cuff edge free. The cuff needs to be the most flexible section for slipping on the glove, so stitching the netting to the cuff would confine it.

Cut off any excess that extends beyond where the stiches were placed. There's probably a better way to do this but it works.


5. Make the claws
To make the claw tips of the glove, I used a basic craft foam sheet that is 2mm thick. These are a bit different than the EVA cosplay foam, and are kept in the craft store with the "kids" craft section with glitter, felt, markers, etc. The thinness keeps the foam flexible so that when worn it fits snugly over the fingers. Important, because instead of using chains to attach it to the rings, these will be separate items. First, draw up the design.

Essentially every finger will need two of these, so you should have ten in all. Trace ten of these into the foam and cut out.

Then sew the two halves together with a running stitch so that it makes a sleeve for your finger.

You can probably vary the size of the claw to match your finger, but I found this pattern worked decently well for all my fingers.

Next paint a layer of Plastidip over the claws and let dry. I used a chapstick tube as a mount for the claw when painting and letting dry, though I also later found a Sharpie works well.

Then paint with a few layers of dark copper spray paint, followed by clear coat sealer.

6. Make the rings
If you can find the ring blanks, these are very simple to make. Get five ring blanks and five dark blue marbles. Preferably the marbles would be dark blue glass decorative stones, but I couldn't find any with deep blue that I was looking for.

Using a glue gun, attach the marbles to the ring. Add an extra ring of glue around the edges for a sure fit.

Once dry you can go back with a metallic marker to color the glue gold, copper, or silver. It's hard to make it out in the photos, but a pale gold seems appropriate and at least is better looking than exposed hot glue.

7. Putting it all together
The final touches will be making sure all the pieces fit together. The claws and rings should be able to hold on their own, but the gauntlet, ring remote, and mail glove should be attached to each other. To do so, I add some half-inch sections of webbing. First I sewed a length of webbing around the wrist-ward strap onto the ring remote.

Then I glued the other end of the strap to the cuff of the gauntlet with E6000 glue.

Then sew another strap onto the front of the ring remote and attach a sew-on snap to it.

Then sew the other end of the snap to the underside of the glove, like so.

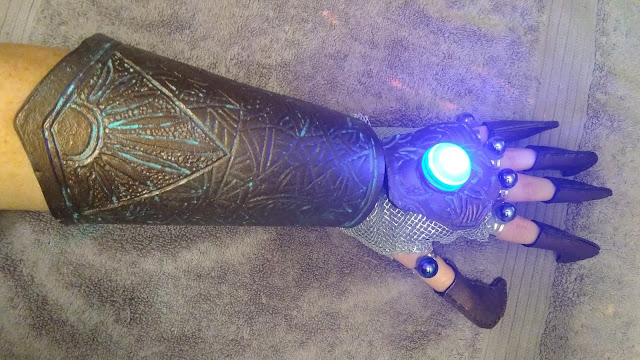
And together it should look like this.


And there you have it, a ring remote fitting of a Prime for Ra. Good luck and keep crafting!
Once dry you can go back with a metallic marker to color the glue gold, copper, or silver. It's hard to make it out in the photos, but a pale gold seems appropriate and at least is better looking than exposed hot glue.

7. Putting it all together
The final touches will be making sure all the pieces fit together. The claws and rings should be able to hold on their own, but the gauntlet, ring remote, and mail glove should be attached to each other. To do so, I add some half-inch sections of webbing. First I sewed a length of webbing around the wrist-ward strap onto the ring remote.

Then I glued the other end of the strap to the cuff of the gauntlet with E6000 glue.

Then sew another strap onto the front of the ring remote and attach a sew-on snap to it.

Then sew the other end of the snap to the underside of the glove, like so.

And together it should look like this.


And there you have it, a ring remote fitting of a Prime for Ra. Good luck and keep crafting!
 |
| Watch out for those incoming rings |
 |
| Fear the claw and the crazy eyes |


Comments
Post a Comment