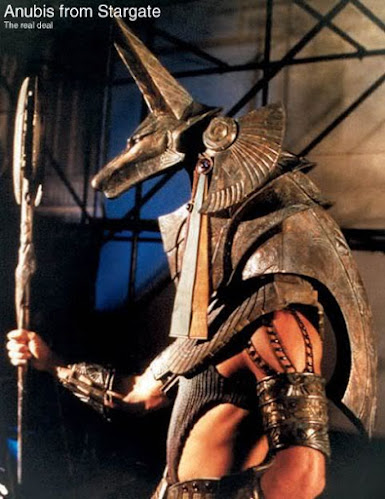
How to make the Stargate Anubis Guard left armlet
Ah yes, yet another armor/jewelry piece needed for the complete Anubis Guard. The basic piece is simple enough, using EVA foam to mimic metal, which a few extra bits. Although I've seen a few ways cosplayers have replicated this piece of the costume, I've yet to see anyone attempt to add the beaded strands. So I though I'd give it a go, added some basic beading work to make it pop.

References


Materials
-8mm EVA foam
-Black spray paint
-Dark copper metallic spray paint
-Plastidip
-Turquoise acrylic paint
-Clear coat sealer

References


Materials
-8mm EVA foam
-Black spray paint
-Dark copper metallic spray paint
-Plastidip
-Turquoise acrylic paint
-Clear coat sealer
-Black nylon webbing (1 inch wide)
-Black elastic (1 inch wide)
Tools
-Boxcutter
-Dremel tool with sanding drum
-Scissors
-E6000 glue
-Woodburner
-Heat gun

Then paint on Plastidip to prime the foam. After that, use a dark copper metallic spray paint to cover the piece.

Afterwards, add patina. Paint turquoise paint into the grooves, then wipe away most of the paint with a damp paper towel. Once you're satisfied with the amount of patina, use the clear coat sealer to protect the paint.
5. Adding attachments


So I sewed it to the top of the tank top strap. You could sew it underneath, but you do it'll likely scratch against your skin.

6. Making the strings
To make the jeweled strands you'll need an assortment of jewelry supplies. I used brass chain, jump rings, lobster clasps, and an assortment of dark blue/purple tubular or lozenge-shaped glass beads. Ideally the beads should be the same shape, but just browsing I couldn't find just the right type.

I cut six lengths of 8.5 inch chains, two for each of the three strands.

Then I picked out the order of beads for the strands. This is an early attempt at ordering, but it gives the general idea. I opted for 7 beads per strand and tried to keep the pattern consisted across all three strands. One other disadvantage of these particular beads is that some have two colored sides, one purple/blue and the other gold. But it's close enough for my needs.


Like so. I started in the middle, then the opposing ends, and then filled in the gaps to try to keep them spaced evenly.

And so this is the final result. If I did this again I'd add more beads, maybe 9 or 10 per strand rather than 7.

And then at either end of each strand, add a jump ring to connect the two chains and add a lobster clasp to the jump ring. That way the strands can be attached to the armlet and the shirt.

7. Putting it all together
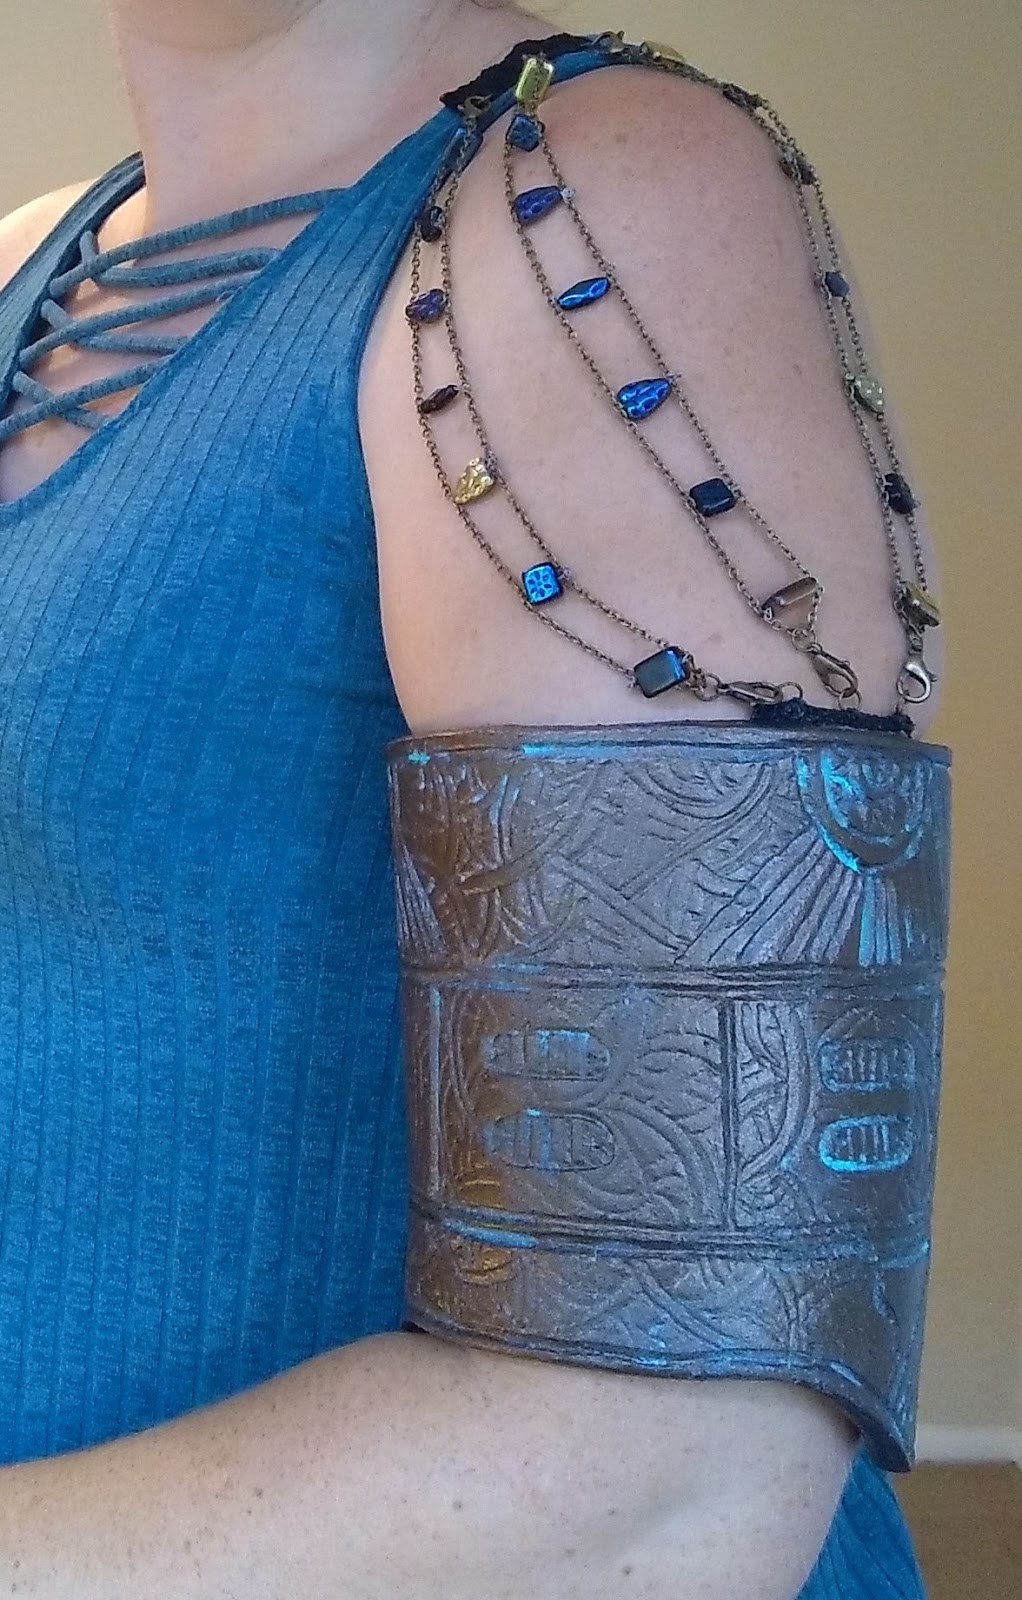
Finally, attach the strands into place, onto the armlet and the shirt.

Carefully put it on and there you have it. Good luck and keep crafting!


-Brass-colored jump rings
-Brass-colored fine cable chain
-Brass-colored lobster clasps
-Tube of California blue czech glass beads (or other tubular or lozenge-shaped dark blue glass beads)
-Very thin jewelry wire (about 28 gauge)
Tools
-Boxcutter
-Dremel tool with sanding drum
-Scissors
-E6000 glue
-Woodburner
-Heat gun
-Pliers
-Needle/thread
1. Gather the materials
From the craft store, you'll need 8mm EVA foam and turquoise acrylic paint. In the jewelry section, brass-colored cable chain, jump rings, lobster clasps, some dark blue glass beads (tubular or lozenge-shaped), and thin jewelry wire. And then from the fabric area, you'll need some black nylon webbing and 1inch elastic. From the hardware store you'll need a dark copper metallic spray paint, black spray paint, and Plastidip.
2. Cut out the armlet
First make the pattern. The pattern I made isn't exact, but it captures the overall shape. In the reference photos you can see that the armlet is essentially a broad band that flares wider toward the back. It's hard to say if this happens equally, but that's how I designed it. Below is the first stab at gauging the flaring, with the center of the pattern representing the front-facing point.

With the flaring balanced on both sides of the pattern, I then cut out it out of 8mm EVA foam with a boxcutter knife. In retrospect, the armlet might be more comfortable with a thinner foam of maybe 5mm or 6mm, but it achieves the desired effect.

Sand down the edges. Then cut four 2-inch pieces of nylon webbing.

Then I used E6000 glue to attach the straps, two to either side of the armlet. Add the glue along the top and bottom edges. Later on elastic will be fed through the straps so that it can slip on the arm easily.

3. Carve the pattern
The pattern of the armlet has some definite differences from the other armor pieces. In the reference photo you can see that it seems the design is divided into three sections vertically. In the topmost section, the most striking element is what looks like an abstract sun design that faces left or "outward", so I made sure that was included. For the middle section there are recurring tabs, and the bottom flared sections seem to have a kind of abstract wing design. First I drew it out in pencil, just to make sure I included these key elements.

But after inscribing those elements, I reverted back to the generic "Stargate" texture seen on the Stargate, Jaffa armor, etc., the series of arcing lines that diverge at random points. For this texture I tried to keep it shallower, and kept the sun, tab, and wing elements incised deeper into the foam.

So that this is the resulting pattern, certainly not identical to the original prop but emulating the original.

4. Prep and paint
Use a black spray paint to cover the inside of the armlet, because if it's left white it'll be a giveaway that it's a foam piece. Once dry, heat the foam and wrap it around a large bottle or something to mimic the curve of an arm. Let cool, and then sew on lengths of elastic to the straps on one side, and then close the loop on the other side of the armlet.

Then paint on Plastidip to prime the foam. After that, use a dark copper metallic spray paint to cover the piece.

Afterwards, add patina. Paint turquoise paint into the grooves, then wipe away most of the paint with a damp paper towel. Once you're satisfied with the amount of patina, use the clear coat sealer to protect the paint.
5. Adding attachments
Now to get the jeweled stranded to attach to the armlet later you'll need to do some prep work. Essentially the strands will need to be able to attach to the armlet and to the shirt/top worn with the guard costume. To start, cut out about a 2 inch length of 1inch-wide nylon webbing, and then cut it down to 1/2 inch wide. Glue it to the inside of the armlet where it would face left or "outward", but leave it so some of the webbing peeks up above the edge. Sew three jump rings to the nylon webbing.

Here's another view of the placement.


Then do the same for the shirt. I started with a tank top, the straps of which will be hidden by the collar.

So I sewed it to the top of the tank top strap. You could sew it underneath, but you do it'll likely scratch against your skin.

6. Making the strings
To make the jeweled strands you'll need an assortment of jewelry supplies. I used brass chain, jump rings, lobster clasps, and an assortment of dark blue/purple tubular or lozenge-shaped glass beads. Ideally the beads should be the same shape, but just browsing I couldn't find just the right type.

I cut six lengths of 8.5 inch chains, two for each of the three strands.

Then I picked out the order of beads for the strands. This is an early attempt at ordering, but it gives the general idea. I opted for 7 beads per strand and tried to keep the pattern consisted across all three strands. One other disadvantage of these particular beads is that some have two colored sides, one purple/blue and the other gold. But it's close enough for my needs.

To attach the beads to the chains, I used a very thin and flexible wire. I threaded the bead onto the wire, and then fed them through links in the chains.

Like so. I started in the middle, then the opposing ends, and then filled in the gaps to try to keep them spaced evenly.

And so this is the final result. If I did this again I'd add more beads, maybe 9 or 10 per strand rather than 7.

And then at either end of each strand, add a jump ring to connect the two chains and add a lobster clasp to the jump ring. That way the strands can be attached to the armlet and the shirt.

7. Putting it all together
Finally, attach the strands into place, onto the armlet and the shirt.

Carefully put it on and there you have it. Good luck and keep crafting!


Comments
Post a Comment