How to make a Flash Gordon shirt
Want to confuse fans of DC's The Flash? And also celebrate one of the most ridiculous and enduring heroes of Earth? Then here's an incredibly simple shirt you can make for everyday saving the universe from psychopathic dictators.
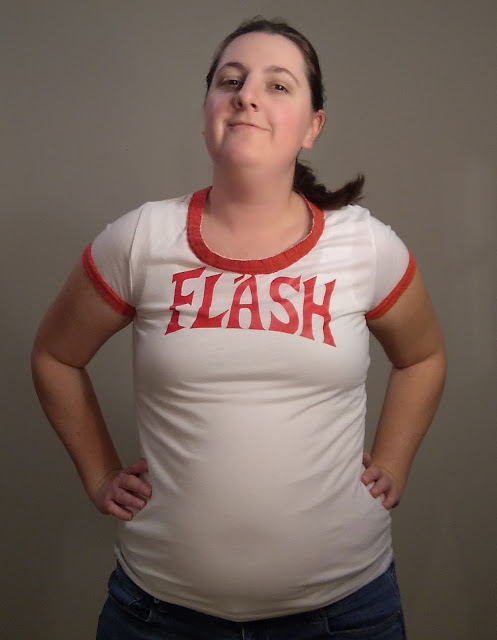 Front:

Back:

Materials
-White t-shirt
-Red t-shirt material
-Red sport-flex iron-on
Tools
-Needle/thread
-Scissors
-Hobby knife
-Iron
Reference Image

1. Gather the materials
The materials and tools are pretty simple. I found the T-shirts for very cheap at a thrift store, and the roll of red iron-on material I had left over from making the Red Hood's shirt. I'm using the sportflex iron-on, but a standard vinyl iron-on should work just as well (tip: for the more standard iron-on colors you can buy these rolls very cheap at Walmart). To get a more precise cut they make Cricut machines that will do the stencil and cutting work for you, but that's a big investment beyond my immediate interest. Instead I relied on my old standby tools of scissors, hobby knife, and needle and thread.

2. Add the cuffs
You may be able to find a white shirt that already is a "red ringer", with the cuffs and collar already red. If not, you can do what I did here. I had an old red T-shirt that's seen better days, so I took scissors to it and cut out the cuffs, collar, and bottom hem of the shirt.

Then I pinned the cuffs into place and attached the cuff with a whipstitch, layering the red cuff over the top of the shirt cuff. The red cuff was actually larger than the white, so I ended up cutting down the length of the cuff to match.

But since the rough edge of the where I cut the cuff away from the red T-shirt is visible, I folded the rough edge under and then kept it in place with a running stitch. You can see this better from where I matched the cut hem of the red shirt with the collar of the white shirt.

It's not terribly pretty, but for a hand-sewn edge it's better than I usually manage. Of course you can be much neater with a sewing machine.
3. Cut the design
The front of the shirt says "Flash", and the back has a lightning bolt. I put the shirt on and figured out where I wanted the word to be, putting down some tape on the bottom corners to figure out the best dimensions for this shirt.

For this particular shirt, I estimated it to be about 5.5 x 9 inches. I then used those dimensions to draw out the stylized word on a piece of paper. The letters are fixed along a mild arch, so I sketched the arch first. Since "Flash" is five letters and the width of the paper is 9 inches, I estimated that each letter should be about 1.75inches wide (with a little wiggle room for spacing in between letters).

The lightning bolt was much easier.
I traced those designs onto the back of the iron-on, and then cut them out.
4. Apply the design
Next, iron on the design. Follow the instructions on whatever product you're using. Be sure to keep the iron moving, and spend some time ensuring the edges of the lettering are binding to the fabric. Although there is a way to "weed" away the negative space between the letters and therefore apply the word as a single iron-on patch, I applied the letters individually to ensure they would all fit in the space. To keep it centered I started with applying the middle letter "A" and then positioned the following letters around it.

Once all the letters are in place, run the iron over it again, paying particular attention to the pointy edges of the letters. Those are going to be the mostly likely spots to peel off, so make sure they stick.

Then peel off the protective film.

And there it is, more or less in the right place and proportion. Not bad for not having an exact template.

And then do the same for the wonky lightning bolt on the back. Draw the design and trace it onto the back of the iron-on.

Then cut the pattern out.

And then position it on the back of the shirt and iron it into place.

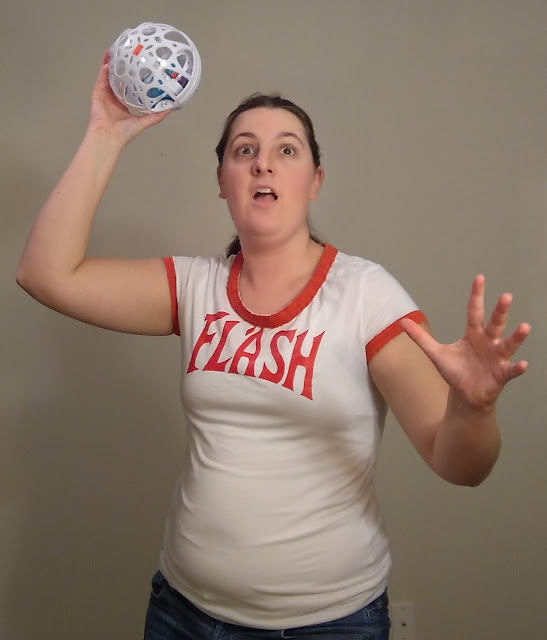
And there you have it, a Flash Gordon shirt made from a thrift store T-shirt, some scraps, and some iron-on materials. I took some extra shots to get a little into character. These make way more sense if you watch the scene where Flash Gordon decides the best way to fight the Emperor's guards is to play football? Good luck and keep crafting!


Back:

Materials
-White t-shirt
-Red t-shirt material
-Red sport-flex iron-on
Tools
-Needle/thread
-Scissors
-Hobby knife
-Iron
Reference Image

1. Gather the materials
The materials and tools are pretty simple. I found the T-shirts for very cheap at a thrift store, and the roll of red iron-on material I had left over from making the Red Hood's shirt. I'm using the sportflex iron-on, but a standard vinyl iron-on should work just as well (tip: for the more standard iron-on colors you can buy these rolls very cheap at Walmart). To get a more precise cut they make Cricut machines that will do the stencil and cutting work for you, but that's a big investment beyond my immediate interest. Instead I relied on my old standby tools of scissors, hobby knife, and needle and thread.

2. Add the cuffs
You may be able to find a white shirt that already is a "red ringer", with the cuffs and collar already red. If not, you can do what I did here. I had an old red T-shirt that's seen better days, so I took scissors to it and cut out the cuffs, collar, and bottom hem of the shirt.

Then I pinned the cuffs into place and attached the cuff with a whipstitch, layering the red cuff over the top of the shirt cuff. The red cuff was actually larger than the white, so I ended up cutting down the length of the cuff to match.

But since the rough edge of the where I cut the cuff away from the red T-shirt is visible, I folded the rough edge under and then kept it in place with a running stitch. You can see this better from where I matched the cut hem of the red shirt with the collar of the white shirt.

It's not terribly pretty, but for a hand-sewn edge it's better than I usually manage. Of course you can be much neater with a sewing machine.
3. Cut the design
The front of the shirt says "Flash", and the back has a lightning bolt. I put the shirt on and figured out where I wanted the word to be, putting down some tape on the bottom corners to figure out the best dimensions for this shirt.

For this particular shirt, I estimated it to be about 5.5 x 9 inches. I then used those dimensions to draw out the stylized word on a piece of paper. The letters are fixed along a mild arch, so I sketched the arch first. Since "Flash" is five letters and the width of the paper is 9 inches, I estimated that each letter should be about 1.75inches wide (with a little wiggle room for spacing in between letters).

The lightning bolt was much easier.
I traced those designs onto the back of the iron-on, and then cut them out.
4. Apply the design
Next, iron on the design. Follow the instructions on whatever product you're using. Be sure to keep the iron moving, and spend some time ensuring the edges of the lettering are binding to the fabric. Although there is a way to "weed" away the negative space between the letters and therefore apply the word as a single iron-on patch, I applied the letters individually to ensure they would all fit in the space. To keep it centered I started with applying the middle letter "A" and then positioned the following letters around it.

Once all the letters are in place, run the iron over it again, paying particular attention to the pointy edges of the letters. Those are going to be the mostly likely spots to peel off, so make sure they stick.

Then peel off the protective film.

And there it is, more or less in the right place and proportion. Not bad for not having an exact template.

And then do the same for the wonky lightning bolt on the back. Draw the design and trace it onto the back of the iron-on.

Then cut the pattern out.

And then position it on the back of the shirt and iron it into place.

And there you have it, a Flash Gordon shirt made from a thrift store T-shirt, some scraps, and some iron-on materials. I took some extra shots to get a little into character. These make way more sense if you watch the scene where Flash Gordon decides the best way to fight the Emperor's guards is to play football? Good luck and keep crafting!


Comments
Post a Comment