How to make superhero logos for costumes
Materials
-Sheet of tough plastic (plastic bin)
-Black spray paint
-Clear coat enamel spray paint
-White acrylic paint
Tools
-Hobby knife
-Scissors
-Sharpie
-Ruler or compass
-Needle/thread
1. Gather the materials
There are several ways you can do this, but I chose to make the logos and stencils from hard plastic. I cruised the local dollar store and found a number of candidates in the kitchen and storage sections. I settled on using the plastic from a red plastic storage bin, bought for a $1. I already had the black and clear coat enamel spray paints and the tools, and picked up a bottle of white acrylic paint for another $1.
2. Cut the logo plates
I marked 4 inch diameter circles, which can be drawn with a compass or by tracing an existing 4in cup or pattern.
3. Design the logo
Since I am making an invented superhero, half the fun of this project is designing in the logo. As Batman has bats and Squirrel Girl the squirrels, I decided to take another awesome animal and immortalize in superhero fashion. For a striking design, I chose to keep it to simple dynamic colors of red, black, and white. The loon and the outer ring are going to be painted black, and the negative space and eye will be left the underlying red color. Details drawn here of the feathers and sections on the neck would be embellished later with white paint.
4. Make the stencil
Depending on the materials you have and the color scheme, the stencil process is going to be slightly different for everyone. For mine, I wanted the red to be the accent color, meaning that most of the red base was going to be covered with black paint. I defined the area of the logo that I wanted to remain red, adding the triangular points as "sun rays" to keep it all in one piece and to make it a little more dynamic.
Then cut out the stencil.
5. Using the stencil
With a little bit of tape, I then secured the stencil into place on the red circles. I cut a small circle of tape and placed it where I want the red eye to show through. The key is to keep the edges of the stencil flush to the surface of the object being painted. I then used black spray paint to cover the exposed spaces.
The effect is a little less crisp on mine because I wasn't able to get the stencil as tight to the other surface as I wanted, but it looks all right.
For a second cape fastener on the opposite shoulder, repeat this process but flip the stencil over. That way the logo is mirrored rather than a straight copy, although if your design is completely symmetrical this detail won't matter.
6. Adding the details
After allowing the black paint to completely dry, I carefully started applying the white edges to the loon feathers. I found I had better control with a dollop of white acrylic paint and a small paintbrush, though I had experimented with using a white-out pen. If using white-out be careful, as the white-out doesn't bond too well with the black paint and overenthusiastic scraping could scratch through.
Touch up any rough edges with a bit of black acrylic paint or a Sharpie, and add any finishing touches. For my loon I needed to add the black pupil in the eye as well (I did that before the white paint but it's not a big deal). After time to try, add a light coat of clear coat enamel to seal all the paint in, which will protect it from flaking off. Add a few light coats with plenty of time for drying in between.
7. Attaching the logos
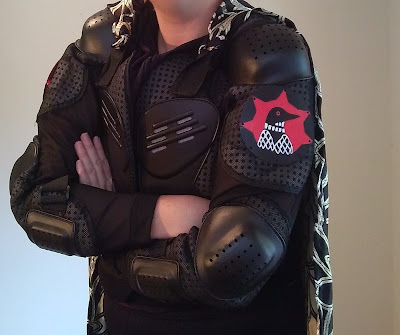
I considered a couple different methods for attaching these to my costume. I figure there are three good methods for attaching them to the motocross armor. Attaching a strap to the back of the logo to slide onto the straps on the armor, gluing alligator pins so that it can be pinned, or punching holes along the edge so it can be sewn into place. I chose to go for the latter, so they could be sewn onto the upper arms to cover up the shadows of the old Fox Racing logos. To punch the holes I used a Crop-o-Dile eyelet and snap tool, which has a really nice and precise hole punch. I punched 8 holes at regular interval around the edge, being sure not too close to the edge.
Next, position the logos on the armor. With a few stitches at each punched hole, secure the logo to the padding beneath.
And there you have it, a little extra color and detail to a superhero's armor. Good luck and keep crafting!


Comments
Post a Comment