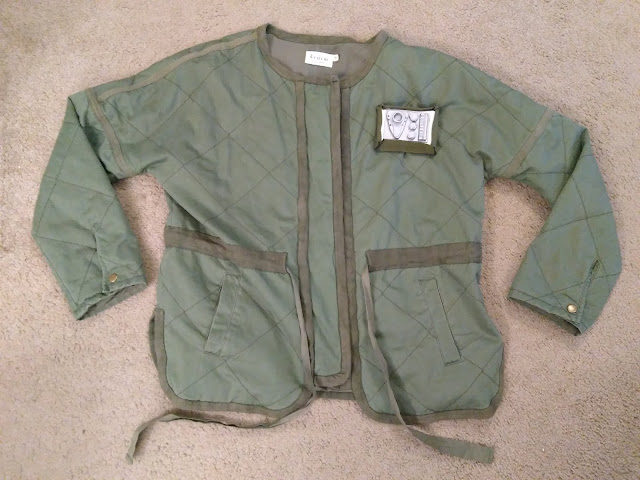
How to make a Comm Badge Wallet for a Rebel Trooper
Star Wars has a thing for greeblies (or greebles, whatever). A lot of what makes Star Wars are the small details around the edges, in costuming, ship and set design, etc. And I'm a fan of trying to make some of these details have some extra details. So I tried to make a comm badge that could double as a secret compartment.
Materials
- Olive green cotton
- Olive green cotton trim (1in wide)
- Thin refrigerator magnet (2.5in x 3.5in)
- Hammered silver spray paint
- Rectangular aluminum tin with sliding lid (3 5/8in x 2 1/4in x 3/8in)
- Jewelry clips
Tools
- Needle/thread
- Superglue
- Scissors, hobby knife
- Dremel tool (sanding)
- Plastidip
- Clear coat sealer
References
 |
| 3D schematic for a badge made by Printed Propz |
 |
| 3D-printed reproduction by Star Forge Curios |
1. Gather the materials
From the craft/fabric store, you can find the foam, fabric, webbing, and jewelry clips. I ordered the sliding top container from Amazon, got the paint and plastidip from the hardware store, and picked up a cheap fridge magnet from Five Below.
2. Make the comm badge
This part will essentially be a small wallet with the comm badge details on it. To get the most screen accurate you could purchase 3D-printed replica and attach it to the front of the case, but I went for reproducing the badge from hand-cut EVA foam. This design is based on stills of the rebel troopers on Scarif in Rogue One, though you can just as easily choose designs seen in different films of eras.
There are eleven pieces here in all, formed from 3 thicknesses of EVA foam. The backing is a rectangle in the dimensions 2in x 3in (2mm thick). The triangular piece is about 1.75in long by 1.5in across, bottom layer of circular buttons are .5in diameter, and the rectangular piece is 1.7in by .5in (all of which are from 5mm thick foam). The rectangular piece is sectioned into nine on along the left side, seen better in the reference photos. The second layer on top of the triangular piece is 2mm, as are the second layers on the round buttons. The top player of the triangular piece is of 8mm thick foam. For the round pieces it's likely there are better ways to standardize the shape, maybe by use of hole punches, but close enough for my first attempt.
Here's a closer look. Once carved, the pieces were sanded and then glued into place.
To prep for painting, the surfaces were then covered in Plastidip.
Then spray-painted with a hammered silver, and once dry finished with a clear coat sealer. Then it was superglued onto the sliding top of the canister.
3. Make the backing
First cut a piece of the olive cotton cloth that is about an inch or so larger by length and width than the magnet (about 4.25 in x 6in). Doesn't have to be perfect though, I used a scrap. Glue the magnet in the center onto the cloth, decorative side down.
The superglue may seep through the fabric, if so you can use a scrap of the fabric as an extra layer on the back.
When dry, roll the edges of the fabric twice so that the raw edges are tucked under and the edge overlaps the edge of the magnet. Sew down the edges with a running stitch. This will give the magnet a little more security and provide a sturdier surface to which to the sew the edge pieces.
Next cut the edges from the olive cotton trim material. These pieces should start out to match the measurements of the magnet with rolled edge backing. For this one, two of 3.25in and two of 4in. Then the ends of the trim should be angled, so that when they are upright over the tin they fit together. To do this I made it so the long side remained the same length of the backing, and the short side is the length of the magnet only. For example, the length of the backing is 4in, so for the length trim one side is 4in and the other side is 3.5in, and the line is angled edge is bridging that gap between 4in and 3.5in. Hard to put into words, better shown below. Treat the cut edges with a no-fray spray or even superglue, otherwise the natural fibers will unravel.
Then attach the trim to the backing using a running stitch. You may want to experiment and do the same to attached the trim at the corners to each other, although I would keep two corners free like a flap so that you can easily take the tin in and out.
Then I sewed on two jewelry clips to the upper corners of the backing. To make this more permanent and secure I would recommend sewing the backing to the jacket itself, but at this point I'd prefer mine to be removeable.
Affix the whole thing to the left breast pocket area of your preferred jacket.
Good luck and keep crafting!
Some other ideas:
 |
| Comm badge on Poe Dameron's jacket in The Force Awakens |
 |
| Rank badges for the rebels on Hoth, Empire Strikes Back |
 |
| Rank badge for Leia on Endor, Return of the Jedi |
 |
| Comm badge for Rose Tico in The Last Jedi |


Comments
Post a Comment