How to make Stargate Anubis Guard Sandals
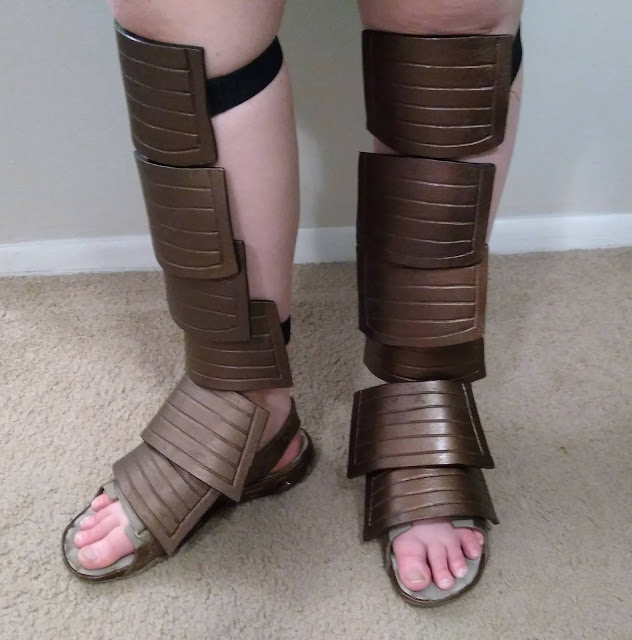
Are they sandals? Greaves? I'm not sure but they're essential to the Stargate Anubis guard ensemble. From a practical standpoint I think the boots in SG-1 make way more sense, but to keep with the ancient Egyptian style I'll agree the sandals look more the part. Here's a way I found to make my own pair out of some thrift store sandals, EVA foam, nylon webbing, and elastic.
References
Materials
-Comfortable open-toed sandals that can be painted (Columbia or similar)
-5mm EVA foam
-Dark copper metallic spray paint
-Turquoise acrylic paint
-Clear coat sealer
-1inch-wide black nylon webbing
-1inch-wide black elastic
Tools
-Boxcutter
-Dremel with sanding drum
-E6000 glue
-Woodburner
-Heat gun
-Scissors
-Needle and thread
-Masking tape
1. Gather the materials
As you'd expect the key part of what will make this build work is having a good sandal to work with. If you're going to be wearing them for any length of time you'd better hope they'd be durable and comfortable. For this you'll need a sandal with a heel strap and preferably two straps across the top of the foot. The straps ensure that your foot isn't flopping around like in a flip flop, and provides more opportunity for the greave plates to be securely attached to the sandal. It also helps if the sandal starts out as a tan or brown, so that if some paint flakes off during wear it doesn't automatically spell doom for emulating ancient space Egyptians (try saying the same thing with some fluorescent orange sandals). These are Columbia sandals I picked up from a thrift store for $8, a lucky find.
The rest of the materials are items that have been useful for the other armor pieces. Only one thickness of EVA foam is needed (5mm). From a hardware store find dark copper metallic spray paint, clear coat sealer, and Plastidip. From a craft/fabric store you'll need turquoise acrylic paint, elastic, and nylon webbing.
2. Cut and sand the armor pieces
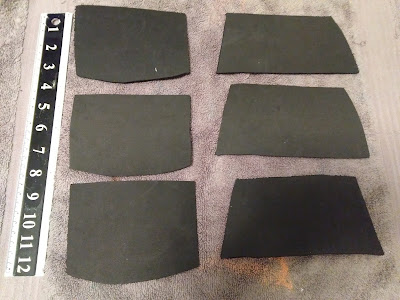
First create the templates for the greave plates. You'll need two patterns, as you see below. The upper one is for the first three plates that start at the knee, mostly rectangular but with a belling out on the bottom (3.25" x 5"). The lower one is for the last three plates that cover the sandal and ankle, which ends up being a trapezoidal shape (similar dimensions, longer side of the trapezoid is 7").
For each sandal you'll need 3 of each pattern, so ultimately 6 of each. Trace onto EVA foam and cut out with a boxcutter.
Sand the edges.
3. Detail and mold
The details of the greave pieces are essential like those below. Sketch the lines in pencil and then follow through with a woodburner tool.
Use a heat gun to make the plates malleable. Once evenly warm, bend it around a wine bottle or your leg, and then hold in place until cooled. Below is a shot of this heat process before I burned the groove details, but its better to do the molding after the woodburning.
Next, apply the Plastidip to the greave plates.
Once dry, use the dark copper spray paint to give the plates a metallic look.
For these particular sandals, the only prep work needed was to use masking tape to cover the sole of the shoe and the upper straps. Since the foot will be covering the sole anyway and the original sand color won't be distracting, I decided to skip painting the sole. The sole will see the most wear aside from the bottom, so it seemed better to avoid issues with paint flaking off because of friction with the bottom of the foot against the sole of the shoe. Same issue with the upper straps. They'll be hidden anyway because of the plates, and since these are adjustable velcro straps I didn't want to gum up the velcro with unnecessary paint.
Once taped, repeat the painting. If the sandals you use are different materials you might need to adjust your strategy.
5. Strap work
To make it possible for all the pieces to attach to each other, you'll need a lot of straps. Cut a bunch of 2 inch lengths of webbing.
Then start gluing the short edges down so that they form slots. For the topmost plate you'll need it at three points, like so. For the first and last of the trapezoidal plates, similar. For the plates in between you'll only need a middle strap.
Once dry, loop one end of the elastic through the middle of the topmost plate, and sew it to itself. Feed it through the center straps of all the plates and repeat for the bottommost plate.
For the topmost plate attach a length of elastic that at rest will encircle the upper calf just below the knee.
Do the same for the first trapezoidal piece, so that it will fit around the ankle.
And then for the bottommost plate, add pieces of webbing. Loop it to the straps, and then attach them to the side straps of the sandals.
6. Finishing touches
To match the rest of the armor pieces some patina was needed. To do this, use a turquoise acrylic paint. Paint it into the grooves, then with a damp paper towel wipe off most of the paint. Then use a dry paper towel to blot away any drips.
And there you have it, a pair of sandal/greaves fit for a guard of Ra. Good luck and keep crafting.


Comments
Post a Comment