How to Make a Parasaurolophus Hatchling
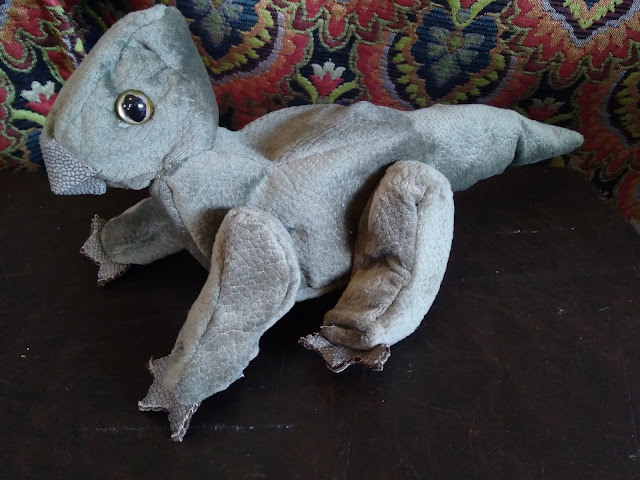
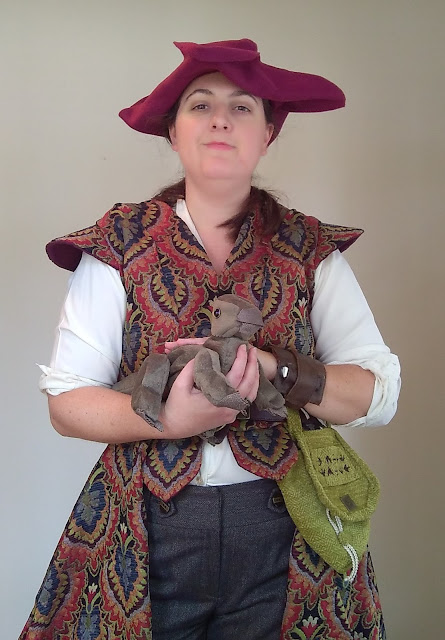
In Dinotopia, humans work and live closely with their dinosaur counterparts, to the point of becoming close friends. And in many cases humans are integral to taking care of young dinosaurs, as stewards of hatcheries and guardians of orphaned hatchlings. Of course for a string of Dinotopia-related projects I had to be one on making a baby dinosaur. In particular I wanted to make a childhood favorite of mine, a young Parasaurolophus. So I set about making one with some flexibility, with poseable limbs so that it can stand on all fours or on its hind legs.

Materials
-Upholstery foam
-Green textured velvet
-Pebble-texture suede
-Cat doll eyes
-Floral wire
Tools
-Scissors
-Boxcutter knife
-Needle/thread
-Superglue
1. Gather the materials
All of these materials can be picked up at a crafts store, although better to make it a fabric store. Upholstery poly foam is a good base, and you can get it in a variety of dimensions. I'd recommend at least on that has a 3inch thickness for the body, head, and tail. I also had some 1inch scrap foam of a similar consistency scavenged from some packaging, which I used for the legs. The floral wire from the floral area and cat's eyes from the doll-making areas.

Close up of the materials. I found both of these selections in a section that's something between outdoor fabrics and upholstery in Joann's. I chose the army green velvet for its interesting texture, but also for its stretch and softness. It's easier to cut and work with, and its flexibility smooths out the edges of the foam pieces in this project. The pebble suede is much thicker and stiffer, difficult to work for the main body but perfect as a contrast material to represent bill, horn, or toughened feet. Alas I could not find similar textures in brighter colors! From our current information we have no idea as to colors and patterns dinosaurs might have sported. However this green doesn't seem unrealistic, as most young animals have more drab or camouflaged patterns to protect them. I experimented with painting patterns on scraps of these fabrics, but they look very artificial and were thus abandoned.

2. Plan the design
First, draw out your design. There's a fair bit of creative license here, but I tried to be more accurate as to what a young Parasaurolophus would look like than is common with most plush versions. The adults have a very recognizable crest, but discovery of a juvenile skeleton shows that the crest would have taken years to develop. This specimen (nicknamed "Joe") was estimated to be about a year old, and below are a few artistic renderings by artist Lukas Panzarin.
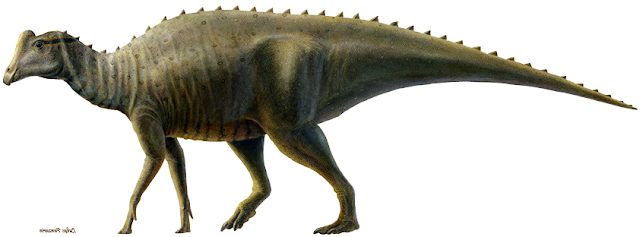


To scale this down to a hatchling, I made it so that the head and legs are proportionately larger than the rest of the body. For some more creative touches, I also pulled inspiration from few James Gurney paintings. For clues on how to construct one in plush form, I also looked over an existing example.


 Originally I'd planned to make it more of a silicone puppet rather than a plush, using the basic instructions given by Only Dinosuars company. Perhaps one day I'll dabble in this, but for the present I decided on making a poseable plush version.
3. Cut the foam
Once the design was drawn, it's time to cut out the pieces. For this, I cut out the body (neck and chest), head, two front legs, two back legs, and a tail. For the width of the legs, I used a 1inch thick section of foam, for the head, body and tail I started with a 3inch wide section.

Here's an example of carving the body, from the side, top, and bottom.


I kept the legs blocky, with squared off feet. This allows more stability for standing, and will be disguised when covered in fabric.

To attach the pieces together, I used pieces of floral wire to connect the tail and legs to the body, allow I advise doing this only after you've worked out the fabric coverings.

3. Cutting the fabric
Using the patterns made to create the parts, begin tracing slightly larger patterns to be used in covering. For example, this is what I developed to cover the head. The left pattern wraps around the front of the face, the right covers the side and sides and bottom of the head. Sew the pieces together with a running stitch wrong sides out, and then pull right side out when finished.


The same process was done for these front legs. I had to cut out a hole in advance so that it would be able to slip over the foam leg. Before completely fitting the fabric over the leg, use the floral wire to attach the leg to the body.


And for the tail, which is basically a tapered tube. This first image is it with wrong sides out, with the running stitch sealing the edges together.


So piece by piece it comes together. The biggest challenge was the body, since I carved it to be more rounded. Don't forgot the leg holes, though keep them at about 3/4 inch diameter. The foam leg should be able to squeeze down that small to pass through. I started by sewing the sides and top.


And then completed by sewing the bottom side of the body. End result should be something like this, which with some careful work should be able to slip over foam body and the finished legs and tail. Leave the head off for now.


4. Making bill, feet, and eyes
The little details are what make or break a plush animal, and help add a little more realism. Parasaurolophus was in the family of Hadrosauridae (aka "duck-billed" dinosaurs), so to give the plush a distinctive "duck-bill" I made a small pattern for the top and bottom lips. The patterns have a small fold over tab to allow it to be added more cleanly to the snout.

I whip-stitched the bottom lip in place, and then the larger top lip so that it forms a little overbite.


Nice touch right? Gives the face a bit of distinction. I considered adding the same material as a covering for the bump of a crest, but am still indecisive on the matter. For the eyes, I bought some Fablab golden iris cats-eyes from Joann's. There are plenty of googly eyes out there, there's a small section of doll-making supplies in most craft stores which have eyes with small pegs for placement. Here's a tip though, definitely stay away from those eyes actually meant for human-based dolls. Human eyes have a very noticeable amount of white sclera that shows, but most animals have a dark sclera. In short, most animals don't have noticeable "whites of their eyes" (one theory why explained here). If you use eyes with the white sclera for dinosaurs, it's going to look either cartoony or creepy as heck. Although I guess if that's what you're into...uh good luck there. Animators tend to use human-like eyes for animals because it's easier to express emotion people can recognize if animator uses what people are used to. For example...
Or done more realistically...
See less like humans and more like actual animals. We don't really know what the pupil shape would've been, though safe bet they would've be similar to existing birds or reptiles, usually rounded or elliptical. The cats-eye is easy to find in most craft stores, and usually found in a variety of colors.
Anyway, cut a hole about the size of the eye's peg on either side of the head. Whatever you do, make sure they're even. Otherwise you will have a very weird-looking dinosaur.

Poke a piece of floral wire through the holes and see if you can tear a bit of path into the foam for the eye's peg to settle into. Then wiggle the peg into place and use a couple drops of superglue to cement the eye to the fabric. There are probably more secure ways to affix the eyes (I wouldn't use this method if giving the toy to a small child else they become choking hazards), but for my purpose it'll do in a pinch.

And finally let's get some feet on there. I used the same fabric for the bill and the feet, and cut out four pairs of three-toed patterns.

Then of each pair, cut one of them down to just the toes. This'll be the "top" of the foot.

Sew the top and bottom of each foot together.

And then sew it onto the bottom of the fabric-covered foam legs.

5. Final touches
Good luck and keep crafting!


Materials
-Upholstery foam
-Green textured velvet
-Pebble-texture suede
-Cat doll eyes
-Floral wire
Tools
-Scissors
-Boxcutter knife
-Needle/thread
-Superglue
1. Gather the materials
All of these materials can be picked up at a crafts store, although better to make it a fabric store. Upholstery poly foam is a good base, and you can get it in a variety of dimensions. I'd recommend at least on that has a 3inch thickness for the body, head, and tail. I also had some 1inch scrap foam of a similar consistency scavenged from some packaging, which I used for the legs. The floral wire from the floral area and cat's eyes from the doll-making areas.

Close up of the materials. I found both of these selections in a section that's something between outdoor fabrics and upholstery in Joann's. I chose the army green velvet for its interesting texture, but also for its stretch and softness. It's easier to cut and work with, and its flexibility smooths out the edges of the foam pieces in this project. The pebble suede is much thicker and stiffer, difficult to work for the main body but perfect as a contrast material to represent bill, horn, or toughened feet. Alas I could not find similar textures in brighter colors! From our current information we have no idea as to colors and patterns dinosaurs might have sported. However this green doesn't seem unrealistic, as most young animals have more drab or camouflaged patterns to protect them. I experimented with painting patterns on scraps of these fabrics, but they look very artificial and were thus abandoned.

2. Plan the design
First, draw out your design. There's a fair bit of creative license here, but I tried to be more accurate as to what a young Parasaurolophus would look like than is common with most plush versions. The adults have a very recognizable crest, but discovery of a juvenile skeleton shows that the crest would have taken years to develop. This specimen (nicknamed "Joe") was estimated to be about a year old, and below are a few artistic renderings by artist Lukas Panzarin.


To scale this down to a hatchling, I made it so that the head and legs are proportionately larger than the rest of the body. For some more creative touches, I also pulled inspiration from few James Gurney paintings. For clues on how to construct one in plush form, I also looked over an existing example.


3. Cut the foam
Once the design was drawn, it's time to cut out the pieces. For this, I cut out the body (neck and chest), head, two front legs, two back legs, and a tail. For the width of the legs, I used a 1inch thick section of foam, for the head, body and tail I started with a 3inch wide section.

Here's an example of carving the body, from the side, top, and bottom.


I kept the legs blocky, with squared off feet. This allows more stability for standing, and will be disguised when covered in fabric.

To attach the pieces together, I used pieces of floral wire to connect the tail and legs to the body, allow I advise doing this only after you've worked out the fabric coverings.

3. Cutting the fabric
Using the patterns made to create the parts, begin tracing slightly larger patterns to be used in covering. For example, this is what I developed to cover the head. The left pattern wraps around the front of the face, the right covers the side and sides and bottom of the head. Sew the pieces together with a running stitch wrong sides out, and then pull right side out when finished.


The same process was done for these front legs. I had to cut out a hole in advance so that it would be able to slip over the foam leg. Before completely fitting the fabric over the leg, use the floral wire to attach the leg to the body.


And for the tail, which is basically a tapered tube. This first image is it with wrong sides out, with the running stitch sealing the edges together.


So piece by piece it comes together. The biggest challenge was the body, since I carved it to be more rounded. Don't forgot the leg holes, though keep them at about 3/4 inch diameter. The foam leg should be able to squeeze down that small to pass through. I started by sewing the sides and top.


And then completed by sewing the bottom side of the body. End result should be something like this, which with some careful work should be able to slip over foam body and the finished legs and tail. Leave the head off for now.


4. Making bill, feet, and eyes
The little details are what make or break a plush animal, and help add a little more realism. Parasaurolophus was in the family of Hadrosauridae (aka "duck-billed" dinosaurs), so to give the plush a distinctive "duck-bill" I made a small pattern for the top and bottom lips. The patterns have a small fold over tab to allow it to be added more cleanly to the snout.

I whip-stitched the bottom lip in place, and then the larger top lip so that it forms a little overbite.


Nice touch right? Gives the face a bit of distinction. I considered adding the same material as a covering for the bump of a crest, but am still indecisive on the matter. For the eyes, I bought some Fablab golden iris cats-eyes from Joann's. There are plenty of googly eyes out there, there's a small section of doll-making supplies in most craft stores which have eyes with small pegs for placement. Here's a tip though, definitely stay away from those eyes actually meant for human-based dolls. Human eyes have a very noticeable amount of white sclera that shows, but most animals have a dark sclera. In short, most animals don't have noticeable "whites of their eyes" (one theory why explained here). If you use eyes with the white sclera for dinosaurs, it's going to look either cartoony or creepy as heck. Although I guess if that's what you're into...uh good luck there. Animators tend to use human-like eyes for animals because it's easier to express emotion people can recognize if animator uses what people are used to. For example...
 |
| Land Before Time series |
 |
| Zippo from the Dinotopia mini-series |
 |
| Oh god save the children |
Or done more realistically...
 |
| Aladar from Dinosaur (2000) |
 |
| "Raptors" from Jurassic Park: Fallen Kingdom |
See less like humans and more like actual animals. We don't really know what the pupil shape would've been, though safe bet they would've be similar to existing birds or reptiles, usually rounded or elliptical. The cats-eye is easy to find in most craft stores, and usually found in a variety of colors.
Anyway, cut a hole about the size of the eye's peg on either side of the head. Whatever you do, make sure they're even. Otherwise you will have a very weird-looking dinosaur.

Poke a piece of floral wire through the holes and see if you can tear a bit of path into the foam for the eye's peg to settle into. Then wiggle the peg into place and use a couple drops of superglue to cement the eye to the fabric. There are probably more secure ways to affix the eyes (I wouldn't use this method if giving the toy to a small child else they become choking hazards), but for my purpose it'll do in a pinch.

And finally let's get some feet on there. I used the same fabric for the bill and the feet, and cut out four pairs of three-toed patterns.

Then of each pair, cut one of them down to just the toes. This'll be the "top" of the foot.

Sew the top and bottom of each foot together.

And then sew it onto the bottom of the fabric-covered foam legs.

5. Final touches
Good luck and keep crafting!


Comments
Post a Comment