How to make a Dinotopian belt purse
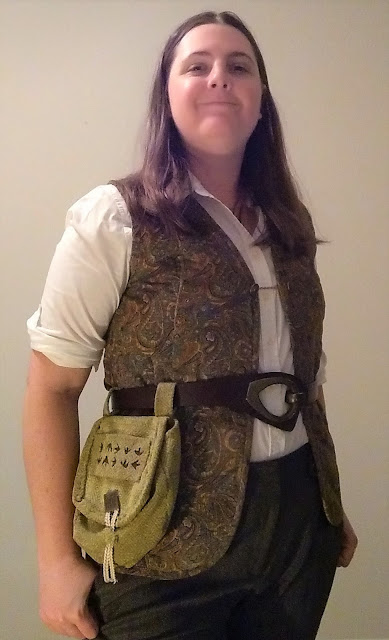
Whether adventuring in the Rainy Basin or strolling the avenues of Waterfall City, one key accessory for your typical Dinotopian is something to put things in. A belt purse fits that description aptly, allowing easy access to a spyglass or journal or other gear. It can fit more stuff than most pockets and is harder to lose than a shoulder purse or knapsack. While a belt purse can fit into a lot of different genres of costuming, brightly textured fabrics and an addition of footprint alphabet badge elevates this into something fitting for the wonders of Dinotopia.
And here's the close-up:

Inspirations
Materials
-Upholstery or brocade fabric
-Contrasting color fabric, preferably lighter weight and unpatterned
-10 inches of cordage
-1 button
Tools
-Needle/thread
-Scissors
-Fabric glue
-Permanent marker
1. Gather the materials
To find these materials all you need is a visit to a good-sized fabric store. For the belt purse I used the patterns from Butterick B5371, primarily made up of a remnant of yellow-green upholstery fabric. I used a remnant of purple linen to contrast the green for making the Dinotopia script badge. And a button with a sun design worked well for the finishing touch.

2. Cut out the parts
I followed the instructions to make the pattern 11 of the B5371, cutting out the patterns and then pinning and cutting out the matching shapes in the green fabric. The description I give here is the summary of summaries, but really you should pay closer attention to the pattern's instructions.

So the resulting pieces should be two flaps, two main pieces, the flap binding, the gusset, and two loops.

3. Sew together the bag
Turn the main pieces and the gusset inside out and pin the gusset edges along the sides of the main pieces. Use a running stitch 1/4 inch away from the edges

The gusset would form a U-shape, while the main pieces form the front and back of the purse.

Then turn the purse inside out.

And then finally fold down the rim of the bag 1/4 inch and sew into place to prevent the rim from fraying.

4. Make the flap and loops
First sew the flap pieces together, the rough sides facing each other. Then sew the binding around the flap in a U-shape, covering the rough edges of the flap except on the top edge.

Then I put together the straps, folding over the long edges to prevent fraying.

And attached them to the back of the bag.

And then attach the flap to the back edge of the purse.

And so altogether you now have the basic elements of the bag.

5. Attach the button and fastening
Toward the bottom middle of the flap, sew the button into place.

Cut a length of cord, about 10 inches or so. Make the middle of the cord the bit that goes around the button. Add a few stitches to attach the cord into place on the bag not the flap.

And then sew a small patch of fabric over the stitches on the cord. If the cord ends are too long you can trim them down.

6. Make the badge
In it self this is a fine belt purse that would work in a variety of universes and time periods. But aside from the curious button there's nothing to overtly make it "Dinotopian." I remedied that by making an additional "script badge", written in footprint alphabet. If you need a primer on how to write things in Dinotopian, see here. Unfortunately footprint alphabet is a bit cumbersome to write longhand (sure helps if you have a three-toed foot), so any lettering on the badge needs to be pretty short for it to be legible. I decided to print on it what I would be using the purse to hold, which would be a journal and assorted gear. So the word I decided on was "NOTES". To begin, cut the rectangles that will become the badge. The green should be about 3x5 inches, and the purple underside will be about 2x4 inches.

For the upholstery material, fold over and sew down the edges. When finished it should come out to be about the same size as 2x4 inch purple rectangle.

So translated what "notes" would look like in footprint alphabet. Then I wrote it as if mirrored, so that I could mark the back of the badge in permanent marker as a guide for cutting. Be sure to think it through thoroughly before starting to cut. The material is a bit thick for precision work with my blunted hobby knife, so I very carefully cut out the letters with scissors.

Then use a fabric glue to attach the purple fabric to the back side of the badge.

So that when it's right side up and the purple shows through it should look like this. Finally sew the badge into place on the bag's flap.

And there you have it, a convenient belt purse that would fit right in the streets of Waterfall City! Good luck and keep crafting!

And here's the close-up:

Inspirations
 |
| The dream team in Dinotopia, with Marion wearing a boxy belt purse |
 |
| Mayor Waldo wearing another belt purse |
Materials
-Upholstery or brocade fabric
-Contrasting color fabric, preferably lighter weight and unpatterned
-10 inches of cordage
-1 button
Tools
-Needle/thread
-Scissors
-Fabric glue
-Permanent marker
1. Gather the materials
To find these materials all you need is a visit to a good-sized fabric store. For the belt purse I used the patterns from Butterick B5371, primarily made up of a remnant of yellow-green upholstery fabric. I used a remnant of purple linen to contrast the green for making the Dinotopia script badge. And a button with a sun design worked well for the finishing touch.

2. Cut out the parts
I followed the instructions to make the pattern 11 of the B5371, cutting out the patterns and then pinning and cutting out the matching shapes in the green fabric. The description I give here is the summary of summaries, but really you should pay closer attention to the pattern's instructions.

So the resulting pieces should be two flaps, two main pieces, the flap binding, the gusset, and two loops.

3. Sew together the bag
Turn the main pieces and the gusset inside out and pin the gusset edges along the sides of the main pieces. Use a running stitch 1/4 inch away from the edges


Then turn the purse inside out.

And then finally fold down the rim of the bag 1/4 inch and sew into place to prevent the rim from fraying.

4. Make the flap and loops
First sew the flap pieces together, the rough sides facing each other. Then sew the binding around the flap in a U-shape, covering the rough edges of the flap except on the top edge.

Then I put together the straps, folding over the long edges to prevent fraying.

And attached them to the back of the bag.

And then attach the flap to the back edge of the purse.

And so altogether you now have the basic elements of the bag.

5. Attach the button and fastening
Toward the bottom middle of the flap, sew the button into place.

Cut a length of cord, about 10 inches or so. Make the middle of the cord the bit that goes around the button. Add a few stitches to attach the cord into place on the bag not the flap.

And then sew a small patch of fabric over the stitches on the cord. If the cord ends are too long you can trim them down.

6. Make the badge
In it self this is a fine belt purse that would work in a variety of universes and time periods. But aside from the curious button there's nothing to overtly make it "Dinotopian." I remedied that by making an additional "script badge", written in footprint alphabet. If you need a primer on how to write things in Dinotopian, see here. Unfortunately footprint alphabet is a bit cumbersome to write longhand (sure helps if you have a three-toed foot), so any lettering on the badge needs to be pretty short for it to be legible. I decided to print on it what I would be using the purse to hold, which would be a journal and assorted gear. So the word I decided on was "NOTES". To begin, cut the rectangles that will become the badge. The green should be about 3x5 inches, and the purple underside will be about 2x4 inches.

For the upholstery material, fold over and sew down the edges. When finished it should come out to be about the same size as 2x4 inch purple rectangle.

So translated what "notes" would look like in footprint alphabet. Then I wrote it as if mirrored, so that I could mark the back of the badge in permanent marker as a guide for cutting. Be sure to think it through thoroughly before starting to cut. The material is a bit thick for precision work with my blunted hobby knife, so I very carefully cut out the letters with scissors.

Then use a fabric glue to attach the purple fabric to the back side of the badge.

So that when it's right side up and the purple shows through it should look like this. Finally sew the badge into place on the bag's flap.

And there you have it, a convenient belt purse that would fit right in the streets of Waterfall City! Good luck and keep crafting!


Comments
Post a Comment