How to make an Iden Versio rebel shirt
One part of the Iden Versio build is creating her shirt. The main change is to add a starbird symbol to the right shoulder, so if you have the right shirt it's a pretty simple project.
 Materials
-Grey 3/4-length shirt ($4.50)
-Red felt ($1.50 for .25yd)
-Red thread ($1)
-Fray Block ($6)
Tools
-Scissors
-Needle/pins
-Measuring tape
-Paper for template
Step 1: Get the materials
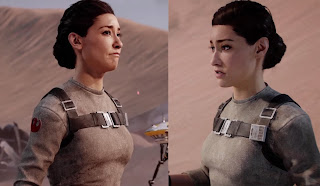
For the base shirt, I went cruised thrift stores. In the reference photos Versio's shirt is a medium grey with a simple color. It's always shown pushed up to her elbows, though it looks to be a 3/4-length shirt. You could probably get away with a full length sleeve though. It also isn't super skin-tight, otherwise the scrunch of the pushed-up sleeves would look different. The shirt I bought was a bit darker than reference, but I figured everything else about it fits. As suggested by Lady Mary, I'm using red felt for the starbird on the shirt's right shoulder. In the photo the starbird is a bit raised, a thick fabric that doesn't quite look like a standard iron-on patch. The red felt I got in the fabric section at Hobby Lobby, a quarter yard for $1.50. Way more than I need, but that's OK. I imagine you can use craft felt too, but the fabric off the bolt seems to be a better quality, less likely to fall apart. I already had the tools and Fray Block, but if not there's a handy craft store for that.
Step 2: Create the starbird
To create the felt starbird, first make a template. In the reference photo, the starbird appears quite small. Using a compass I drew 2 inch and 2.5 inch diameter circles for starbird templates to get an idea of the size on the sleeve.
I drew the designs by hand, but you could probably print them in the proper size. I kind of like how they aren't exact, it's a bit more ragtag like the rebels would be. I think the 2 inch diameter is closer proportionally to reference, but you might adjust the size depending on the shirt size. After cutting the design out, trace the pattern on the reverse side of the felt. Cut out the starbird with scissors. I applied Fray Lock to reinforce the edges, but I don't think it's completely necessary.
Step 3: Attach starbird to shirt
From the references, it appears the starbird is about a length down from where the sleeve meets the shoulder. So that's where I put mine, about 2 inches down. It's in line with the seam that runs from the neck to the shoulder, so that it's even on the sleeve.
Pin it marked side down and sew it onto the sleeve. I used a running stitch with red thread, which seems to work pretty well. Be careful not to sew the sleeve shut and try to keep the sleeve fabric from bunching up beneath the patch.
So here's the finished shirt worn with the basic orange coveralls. It's not a complicated project, but getting the details just right on the starbird can be a bit fiddly. Good luck and keep crafting!
 Materials
-Grey 3/4-length shirt ($4.50)
-Red felt ($1.50 for .25yd)
-Red thread ($1)
-Fray Block ($6)
Tools
-Scissors
-Needle/pins
-Measuring tape
-Paper for template
Step 1: Get the materials
For the base shirt, I went cruised thrift stores. In the reference photos Versio's shirt is a medium grey with a simple color. It's always shown pushed up to her elbows, though it looks to be a 3/4-length shirt. You could probably get away with a full length sleeve though. It also isn't super skin-tight, otherwise the scrunch of the pushed-up sleeves would look different. The shirt I bought was a bit darker than reference, but I figured everything else about it fits. As suggested by Lady Mary, I'm using red felt for the starbird on the shirt's right shoulder. In the photo the starbird is a bit raised, a thick fabric that doesn't quite look like a standard iron-on patch. The red felt I got in the fabric section at Hobby Lobby, a quarter yard for $1.50. Way more than I need, but that's OK. I imagine you can use craft felt too, but the fabric off the bolt seems to be a better quality, less likely to fall apart. I already had the tools and Fray Block, but if not there's a handy craft store for that.
Step 2: Create the starbird
I drew the designs by hand, but you could probably print them in the proper size. I kind of like how they aren't exact, it's a bit more ragtag like the rebels would be. I think the 2 inch diameter is closer proportionally to reference, but you might adjust the size depending on the shirt size. After cutting the design out, trace the pattern on the reverse side of the felt. Cut out the starbird with scissors. I applied Fray Lock to reinforce the edges, but I don't think it's completely necessary.
Step 3: Attach starbird to shirt
From the references, it appears the starbird is about a length down from where the sleeve meets the shoulder. So that's where I put mine, about 2 inches down. It's in line with the seam that runs from the neck to the shoulder, so that it's even on the sleeve.
Pin it marked side down and sew it onto the sleeve. I used a running stitch with red thread, which seems to work pretty well. Be careful not to sew the sleeve shut and try to keep the sleeve fabric from bunching up beneath the patch.
So here's the finished shirt worn with the basic orange coveralls. It's not a complicated project, but getting the details just right on the starbird can be a bit fiddly. Good luck and keep crafting!


Comments
Post a Comment